Creating a new photo essay or story or a documentary on Bangaluru aka Bangalore without any big stuff (means no DSLR or CSC Camera) only a smartphone A1000 Lenovo
Showing posts with label brooding Landscape. Show all posts
Showing posts with label brooding Landscape. Show all posts
Saturday, 23 April 2016

Saturday, 13 June 2015
9 creative photo ideas to try in June
As part of our ongoing series to help you get more creative with your digital
camera, each month we publish some fun, seasonal, creative photo ideas to help
inspire your imagination. Along with some amazing images, we’ve also provided
some quick photography tips by both amateur and professional photographers who
are experts in these fields.
We’re kicking off June with a new list of exciting photo projects like making 3D images, shooting solely with a 50mm lens, making composites and planning your travel photography!
01. Hit the road
We’re kicking off June with a new list of exciting photo projects like making 3D images, shooting solely with a 50mm lens, making composites and planning your travel photography!
01. Hit the road
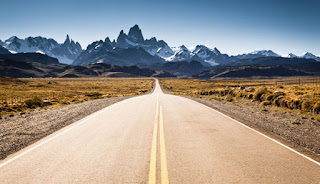
Phgr. Kartik Rawal

While the road trip tends to be more associated with novels like On the Road
and iconic movies like Easy Rider, photographers have long been inspired by the
open road’s visual possibilities and promise of adventure.
Don’t worry though if you don’t have Monument Valley or Route 66 within striking distance, as the spirit of open-road photography can be channelled wherever you are in the world.
This stunning image was taken by photographer Kartik Rawal during a photographic trip to Mount Abu.
“We were lucky with the weather because it’s very unusual to get such sunny day in ABU. For this image, I used a Canon EOS 5D Mark II SLR with a 17-40mm f/4 lens and graduated Neutral Density filter.” Kartik says
While it may be hard to find an open road that stays empty for very long in the cities, the classic image of tarmac snaking into an undiscovered distance remains as alluring and compelling as ever.
Stay tuned For more!...
Don’t worry though if you don’t have Monument Valley or Route 66 within striking distance, as the spirit of open-road photography can be channelled wherever you are in the world.
This stunning image was taken by photographer Kartik Rawal during a photographic trip to Mount Abu.
“We were lucky with the weather because it’s very unusual to get such sunny day in ABU. For this image, I used a Canon EOS 5D Mark II SLR with a 17-40mm f/4 lens and graduated Neutral Density filter.” Kartik says
While it may be hard to find an open road that stays empty for very long in the cities, the classic image of tarmac snaking into an undiscovered distance remains as alluring and compelling as ever.
Get started today
- While you don’t need a totally empty road for this kind of image, it helps with impact, so be prepared to get up well before the traffic. The light tends to much better just after sunrise as well
- You can borrow many techniques and tips from landscape photography – use a tripod (where it’s safe to do so) to keep shots sharp, and set a narrow aperture (higher f number) to maximise depth of field and front to back sharpness. Don’t set too narrow an aperture, however, as your image can end up softer because of diffraction
- Kartik used a graduated ND filter to balance the sky with the middle and foreground, ensuring each section was well exposed. If you don’t have a filter on you, the Graduated Filter tool in Lightroom can also help to give dramatic skies with well-lit foregrounds but use it sparingly. Fixing bad underexposure will also generate noise.
- Try to avoid distractions and clutter by the side of the road, like litter bins, bus shelters and so on.
Stay tuned For more!...
Tuesday, 14 April 2015
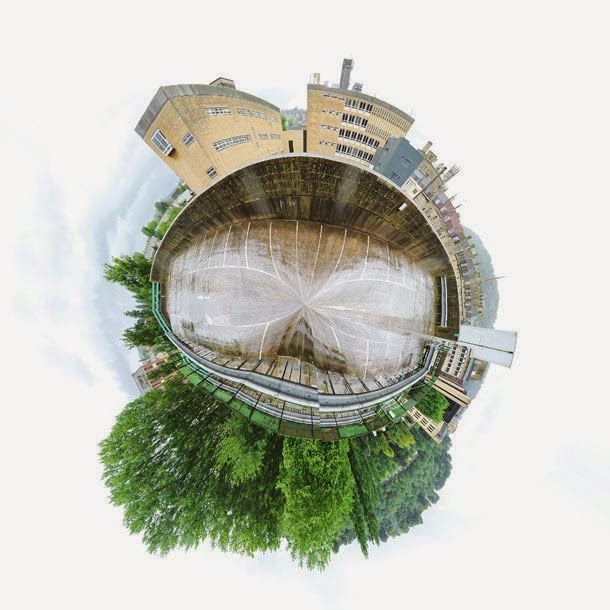
How to make a 360 degree polar panorama
 |
| 360_degree_Panorama |
Polar panoramas are fun takes on the traditional panoramic
‘strip’. The principle is the same – take a sequence of images that you then
stitch together in software – it’s just that you create a circular ‘world’
image at the final stage of the process.
As with other types of
panoramic photography, you need a methodical approach to taking the individual
frames. Take test shots of the brightest and darkest parts of the scene and
work out the base exposure from these results. Use manual mode to set the
aperture and shutter speed, and set the white balance and focus manually too,
as this will ensure consistency across the sequence of pictures.
Make sure the tripod and
head are level and, when you move the camera, allow for approximately 1/3
overlap between each frame. Shooting enough frames to cover a 360 degree image
will mean your final panorama ‘globe’ won’t look stretched or have an obvious
join.
Use panorama software
such as Photoshop’s Photomerge option to stitch and blend the frames together.
The next stage involves flipping the panorama photo vertically and resizing it
to create a square image. To do this, use Image > Image Size in Photoshop.
Make sure the ‘Constrain aspect ratio’ link box is unchecked and then change
the width and height to the same value.
The final step is to use
Filter > Distort > Polar Coordinates, selecting Rectangular to Polar in
the dialog box that appears.
Monday, 6 April 2015
9 creative photo ideas to try in April 2015
As part of our ongoing series to help you get more creative with your digital camera, each month we publish some fun, seasonal, creative photo ideas to help inspire your imagination. Along with some amazing images, we’ve also provided some quick photography tips by both amateur and professional photographers who are experts in these fields.
We’re introducing April with a new list of exciting photo projects like brooding landscapes, portraits of mothers and babies, creative forests and even selling your images!
Creative photo ideas for April: 01 Shoot brooding landscapes

Trying to come up with new ways of shooting landscapes is always a good idea. It’s all too easy to fall into clichés with the landscape genre, and rely too much on tried and tested techniques that produce rather predictable images.
Kartik Rawal went to the popular landscape Jungle of Sirohi-KalkaJi, but managed to come back with something very special indeed by shooting with an DSLR, then doing some creative experimentation afterwards in Photoshop.
Kartik, whose project on deserted roads has also attracted lots of attention, explains he has been taking pictures most of his life, but became a little more obsessive about it 10 years ago while filming a documentary for Surat city.
“Getting lost is half the fun,” says Kartik of his photographic travels.
Get started today
#1 Converting your camera to infrared can yield great results – but do bear in mind that it’s a very bold step to take, as the process cannot be reversed.
#2 “Once you have found the subject you wish to shoot, be aware of its surroundings – how do they interact with your subject?” says Kartik.
#3 Kartik points, you should think carefully about how light affects the subject. “Will waiting for the ‘right light’ helps you much? A different time of day maybe, if you’re lucky?”
#3 “Then use these elements to help build a narrative for the image,” Kartik adds. “These are the stepping stones that help the viewer navigate the image and hopefully make them come back and see something different on the second viewing.”
#1 Converting your camera to infrared can yield great results – but do bear in mind that it’s a very bold step to take, as the process cannot be reversed.
#2 “Once you have found the subject you wish to shoot, be aware of its surroundings – how do they interact with your subject?” says Kartik.
#3 Kartik points, you should think carefully about how light affects the subject. “Will waiting for the ‘right light’ helps you much? A different time of day maybe, if you’re lucky?”
#3 “Then use these elements to help build a narrative for the image,” Kartik adds. “These are the stepping stones that help the viewer navigate the image and hopefully make them come back and see something different on the second viewing.”
Subscribe to:
Posts (Atom)