Sunday 25 May 2014

Moving targets: how to plot trajectory and beat camera shake every time

Discover how to photograph moving targets with our handy guide to the best shutter speeds and plotting a subject’s trajectory.

One of the fundamental rules of photography is that if there is blur in your pictures it has to be there deliberately! There are no excuses for camera shake, and moving targets should be frozen, unless you want make use to blurry effect for artistic reasons.

The key to achieving these things is to use the right shutter speed for the job. Your first stop is to avoid the shakes.

If you are hand-holding your camera, the image is not completely still and you need to set a shutter speed that is fast enough to allow for the involuntary movements of your arms and body.

How fast you need to go will depend on things such as how fit you are and how cold it is, but also on the focal length of the lens you are using.

The longer the lens, the more obvious any slight movement in the lens becomes in the image, necessitating a faster shutter speed than if you had a wider angle of view.

But if you are in any doubt, always play safe and go for a faster shutter speed than you think you need!

Get the best shutter speeds for moving targets

Banish camera shake

  • The standard way of working out which shutter speed to use is the reciprocal rule: if using a 50mm lens, you need to use a shutter speed of 1/50 sec or faster. For a 500mm, use a minimum of 1/500 sec.
  • If you use a crop sensor camera, you need to take the crop factor into account and multiply the shutter speed by 1.5, so use a 1/750 sec with a 500mm lens.
  • If using image stabilisation you can use a slower speed, if the subject isn’t moving.

Plotting a moving target’s trajectory

Shutter speed: 1/1000 sec
It’s the speed relative to you that matters, not your subject’s actual speed. If it’s moving across the frame you need a faster shutter speed than if it’s heading towards you.
Shutter speed: 1/250 sec
You can get away with a shutter speed that is two stops slower (four times as long) if the car is heading towards you… but be warned, the autofocus is more likely to fail!
Shutter speed: 1/30 sec
You can get away with slower shutter speeds by keeping the car in your sights and tracking its movement. These panning shots artistically blur the surroundings.


Fast-action bolt-ons for shooting moving targets

70-200mm f/2.8
A long lens is the tool of choice for wildlife and sport. How long a lens you need will vary, but one with a fast maximum aperture will help you focus faster, get higher shutter speeds and isolate the action from the background.

1.4x teleconverter
A teleconverter is a great portable add-on for giving you more firepower when you need to crop in that bit closer. They only work effectively with certain faster lenses, so shop with care and check the requirements.

Saturday 24 May 2014

How to photograph flocks of birds: 5 ideas for creative images

You don’t need a ridiculously long lens to get beautiful pictures of birds. We explain you how to photograph flocks of birds in five ridiculously creative ways.

01.Shoot a Silhouette

Birds often gather together at dawn and dusk, which is the ideal time for creating colourful silhouettes
Rooks at Sunrise. Taken with: Canon 50D with 300mm f/4. Exposure: 1/500 sec at f/8, ISO200

How I got the shot

Having previously seen flocks of rooks gathered together on electricity pylons, I set out to try to capture a shot that put them in context with this man-made structure.

For the shot to work I needed an interesting sky, so I chose to shoot at sunrise to give myself the best chance of getting what I wanted.

To avoid disturbing the birds I used my bike as a ‘mobile hide’, which I carefully positioned so that the birds were lined up with the most colourful part of the sky behind them.

To create a simple graphic image, I decided to throw the birds and the pylon into silhouette against a well-saturated orange sky.

Key camera settings

I first selected the centre AF point in Single Shot focusing mode, and set an aperture of f/8 in Aperture Priority mode (Av) to ensure all of the birds would be in focus, from front to back.

I then selected Spot metering, and positioned the centre AF point over the brightest part of the sky, before half-pressing the shutter release to focus, and take an exposure reading.

This gave me shutter speed of 1/500 sec. I then locked the exposure using the AE lock (*) button.

Exposing for a bright part of the sky ensured the sky was well exposed and nicely saturated, while that the birds and pylons were under-exposed (and therefore thrown into silhouette).

Field notes

Rooks gather in large numbers at winter roost sites, and will often perch on nearby telegraph wires and pylons after leaving their roost sites early in the morning.

02.Photograph Wading Birds

Late autumn through to early spring is an ideal time to photograph flocks of wading birds as they gather in their tens of thousands around the coast.
Oystercatchers. Taken with: Canon 50D with 300mm f/4. Exposure: 1/1000 sec at f/5.6, ISO200

How I got the shot

As the incoming tide started to cover their feeding grounds, I knew these oystercatchers would move towards me, giving me the perfect opportunity to photograph them.

With the camera set up on a tripod I waited quietly as each incoming wave forced the farthest birds to take flight and join the others.

This was the picture I was after, so I focused on the group of birds at the bottom and framed the shot in anticipation of the airborne birds filling the top half of the picture.

As each group of birds flew in I took a series of shots using the high-speed continuous autofocus setting (also known as burst mode).

Key camera settings

I autofocused on the closest birds and then switched my lens to manual focus to lock the focus, and prevent the lens hunting around for a focus point when the other birds took flight.

I then waited for the moment that some of the birds in flight came into focus to take the shot.

I set exposure in manual (M) mode, taking a reading using evaluative (average) metering from an area of beach that excluded the brighter sky.

Field notes

They key to successfully shooting this wader flock was getting into position whilst the birds were some distance away, and crouching down so that my outline was not visible.

Then by staying still and quiet, the birds remained relaxed and gradually came closer.

03.Capture Motion Blur

Rather than freeze the action, set a slow shutter speed and pan the camera for a more creative image that conveys movement within a flock
Flock of Oystercatchers. Taken with: Canon 50D with 300mm f/4. Exposure: 1/30 sec at f/8, ISO100

How I got the shot

Along the coast at high tide there is usually quite a lot of movement of birds, as groups fly from their feeding grounds to gather at a nearby roost site.

By positioning myself on one of the main flight paths I was able to photograph a succession of small flocks of waders as they flew.

It was a mostly cloudy day and so rather than crank up the ISO (with the resultant noise problems) to get a fast enough shutter speed to freeze the motion, I deliberately chose a much slower shutter speed to capture some blur in the oystercatchers’ wings.

The camera was set up on a tripod, which allowed me to make a smooth pan as the birds flew by, with the aim of keeping some of the birds’ heads tolerably sharp.

Key settings

I set a shutter speed of 1/30 sec in Shutter Priority (Tv) mode to give the right amount of blurring.

To focus, I selected multi-AF point selection (i.e. all to the focus points) and used AI Servo mode (also known as continuous focus or focus tracking) to track the birds.

Field notes

For this type of shot to work it was important that I was positioned roughly parallel to the birds’ flight path.

This allowed me to focus on the birds as they approached from the left, and then take a series of shots as they came square on to the camera.

04.Become an impressionist


When light levels are low, go with the flow and shoot with a very slow shutter speed for lots of blurring and a more impressionistic feel
Starling flock at dusk. Taken with: Canon 50D with 70-200mm lens at 190mm. Exposure: 1/10 sec at f5.6, ISO 400

How I got the shot

On one of my visits to a starling roost the weather was poor, with a heavily overcast sky and low light. There was little point in attempting to get sharp shots of the birds, and even if I had the results would have been rather dull.

Instead I decided to capture a more creative image of the flock by setting a very slow shutter speed.

I was also handholding the camera, so I knew that nothing in the picture would be sharp, with lots of blurring of the birds’ wings, and that this would create an impressionistic representation of the flock that had a real sense of movement.

Key camera settings

I used Aperture Priority (Av) mode and set this to f5.6, which gave me a slow shutter of 1/10 sec at ISO400.

As the light levels dropped, so did the shutter speed, which resulted in varying degrees of blurring, but I found around 1/8 sec was about right for the effect I wanted.

Field notes

 The important point for this shot is to remain flexible in your approach. If the light is not right for one type of shot then think how you can use it to your advantage to create something different.

05.Go back for more

By making repeated visits to a traditional or well-used site you stand a much better chance of capturing interesting behaviour and improving your images

How I got the shot

During the winter months (November to February) in India, large flocks of starlings gather together each evening before going off to roost.

This is one of the great spectacles in the birding world, and a fantastic opportunity for photography.

There are a number of traditional starling roosts around the India and Europe, some of which can number several million birds, but the technique works equally well for other species of bird, and potentially even bats in certain parts of the worlds.

The starlings begin to flock together about 30 minutes before sunset, so I set up my gear close to the roost site, framed the shot against the most colourful section of sky and waited for the action to unfold.

As the birds massed up, I concentrated on trying to capture the most interesting formations.

Key camera settings

By the time the starlings arrived in large numbers the light was fading quickly, so I increased the ISO setting to 800, which gave me a shutter speed of 1/500 sec at maximum aperture – just enough to arrest the movement.

I exposed for the sky using Evaluative (Matrix) metering, which – as with the rooks in Image 1 – rendered the birds as silhouettes.

Field notes

Starlings form their tightest flocks when there is a bird of prey around, which was the case on the evening I took this shot.

When this occurs is a matter of luck, but it’s well worth making several visits to a roost site to capture this at its best.

Friday 23 May 2014

Best camera settings for sunsets (free photography cheat sheet)

The key to choosing the best camera settings for sunsets is to make sure you capture the sunset’s colours as they are, not how the camera ‘thinks’ they should be.

You might also need to adjust the exposure settings to suit the conditions, too, because in extreme lighting situations the camera might not interpret the scene in the way you expect.

In our photography cheat sheet below we’ve provided some of the best camera settings for sunsets. Use these as a starting point and then let your creativity take over!


It’s hard to resist the colours at sunset, but watch your exposure to make the most of them.

Exposing for the sky gives you the best colours, but the foreground will become very dark. Use an ND grad filter to balance the exposure.

Best camera settings for sunsets

Click to see on Large Scale
Exposure mode
Manual

Focus mode
Manual

Shutter speed
1/30sec or longer

Aperture
f/16

ISO
100 or lower

Lens
18-24mm

Drive mode
Single-shot

White balance
Daylight


Final Tip
If you don’t have a neutral density grad fi lter, shoot twice – once exposed for the sky and another for the land. Combine them in Photoshop.

Pre-focus vs tracking: when and how to use each technique

Getting sharp photos of moving subjects is a tricky skill to master, but knowing which technique to use for which subject will help improve your hit-rate…

There are two main ways to focus on moving subjects: you can either use the Servo or continuous autofocus mode, so that the camera ‘tracks’ the subject by continuously adjusting the focus automatically, or you can use manual focus, and wait until your subject reaches a point you’ve pre-focused on in advance.

Which you should use depends to some extent on the type of subject and movement you’re shooting.

Generally speaking you should use continuous autofocus for subjects where the movement is unpredictable, such as birds in flight, animals running or team sports; and manual focus (also known as pre-focusing) for subjects where the movement is more predictable, or regular.

Pre-focus vs tracking – how to capture moving subjects with confidence

01 Select the focus mode

These modes will enable the camera to automatically adjust the focus as the subject moves, as long as you keep the shutter release half-pressed.

With the focusing mode set, you should also set the drive mode to Continuous shooting, to allow you to shoot in bursts to maximise the chances of getting sharp results.

For subjects where you can’t easily predict the direction or speed of the movement, you first need to select the AI Servo (Canon) or Continuous (Nikon) focus mode.

02 Select the AF point


If you’re using a long telephoto lens with a maximum aperture of f/5.6 or smaller, or if you’re shooting in low light, you will get better results by selecting the central point rather than the outer ones, as on most cameras this is more sensitive and accurate.

To give you some control over where in the frame the camera will focus, you need to select the single-point autofocus mode, and then select the focus point where you are going to position your subject in the frame.

03 Track the subject


The most important skill you need to master is keeping the AF point positioned over the subject, to enable the camera to track it as it moves around.

Try to frame your subject as soon as it comes into view, and then follow its movement as smoothly as possible.

While following the subject, you can shoot in short bursts when the focusing has locked-on.

This takes plenty of time to master, so don’t be too disappointed if you don’t get it right first time, especially with subjects such as birds flying, or fast-moving sports.

04 Pre-focusing

If you can predict where your subject will be, such as with a car on a racetrack, you can autofocus on pre-determined point, and then switch your lens to manual focus to lock it off.

Then, without altering the focus, you can either follow your subject through your viewfinder and fire away as it passes this point, or compose your shot in advance and wait for the subject to appear in your viewfinder.

With the camera in continuous drive mode, you can take a short burst of two or three shots just as the subject reaches the point that you’ve pre-focused on.

Thursday 22 May 2014

Minimum shutter speeds for handheld shooting: ‘safe’ speeds to use (and when to seek support)

When to shoot handheld: free cheat sheet

Click to see it Clearly
Subject movement and camera movement are two completely different things.

You can often achieve striking creative effects with subject movement, but camera movement (or ‘camera shake’) just produces an unattractive all-over blur where nothing in the picture is sharp.

There is an easy way to work out the minimum shutter speed for handheld photography, based simply on the focal length you’re using (or effective focal length, if you’re using a crop sensor camera, like the DX-format Nikons in the cheat sheet above).

For example, if you’re shooting at a focal length of 30mm, 1/30 sec is the slowest ‘safe’ speed for handheld photography. If you’re shooting with a 500mm lens, it’s 1/500 sec.

Of course, many lenses have built-in stabilisation features like Nikon’s VR, or ‘Vibration Reduction’ systems. These reduce the effects of shake and allow you to use shutter speeds two to four steps slower than normal.

You have to remember that although this will stop camera movement, it has no effect on subject movement. If you want to freeze a fast-moving subject, you’ll still need a fast shutter speed, with or without VR.

You can use our table, above, to work out the minimum ‘safe’ speeds for different lenses. We allow an extra two steps for lenses with VR – you may get more, but it’s best to be conservative.

 How Vibration Reduction(VR) works

01 Inside the lens, gyroscopic sensors detect any movement and instantly counteract it by moving a ‘floating’ lens assembly which keeps the image steady.

02 Strictly speaking, you should switch the VR off when the camera’s on a tripod because it could introduce vibration. In practice, most of us forget and it doesn’t seem to be a problem.

03 If you’re shooting handheld you can leave the VR switched on all the time. VR doesn’t guarantee sharp shots, but it does improve your chances of good results when you’re using marginal shutter speeds.

04 Some lenses have a special Active mode. This is designed for situations when you’re being badly shaken about as you’re taking pictures – if you’re shooting from a moving vehicle, for example.


Understanding camera shake and focal length


The amount of shake is the same when taking all these shots – it’s the magnification that makes it look worse
Click to See on Large Scale


Tuesday 20 May 2014

Bluebell photography: when and how to take creative spring pictures

The time for bluebell photography is just around the corner. In this tutorial we explain when to take pictures of bluebells, where to find them and how to set up your camera for the best results.
Images Captured By Sudhir Rawal
You have to be watchful at this time of year, because it’s almost time to go down to the woods – not for the teddy bears’ picnic, of course, but for something much more inspiring than that… it’s time for bluebells!

Their wonderful carpets of blue and green are one of the signs of spring, and make for fantastic photos.

Depending on seasonal temperatures and how far south you are, there’s a short window from about mid-April to the end of May during which you can see bluebells. With this year’s mild winter in the UK they may be early, so don’t miss them!

One of the joys of spring in Britain is walking through a woodland to enjoy the birdsong, smell the scented air, see the wildlife and enjoy the peaceful atmosphere.

An established beech wood is best for photographs, as you get tall, straight trees with little undergrowth and not many offshoots or branches protruding from trunks.

You ideally want an open aspect to the east or west side of the woods where you can shoot towards a low sun that’s not too strong.

One bit of advice, though: try to stay on the path and don’t trample the blooms, so others can enjoy them too.

How to photograph bluebells

01 Camera setup

When you’re in the woods photographing bluebells you’ll want to use a low ISO for quality and a narrow aperture to capture a great depth of field.

You’ll need a tripod for those long shutter speeds, and to get maximum benefit from a tripod you’ll need a remote release.

A hotshoe spirit level is also useful. Woods are often muddy places, and a kneeling mat or plastic sheet will help keep you clean. You may also want to wear your wellies!

02 DSLR settings


We also went for a narrow depth of field with f/22 and adjusted the shutter speed to obtain our necessary exposure. We manually focused the lens on the nearest tree using Live View.

For an image that you’re going to blur, you could use almost any ISO setting because noise won’t show up. Since we wanted to also capture some lovely bluebell images that wouldn’t be blurred, we chose Raw capture and ISO 100 for the quality.

 03 Lens choice


We were lucky with our carpet of blooms, so went with a 24mm on a full-frame body, equivalent to 15mm on an APS-C model.
Which lens you use is a personal choice based on your location. The usual technique is to shoot wide and low to the ground to include lots of blooms close to the lens, but if the flowers are a little sparse try a long lens: shoot higher, and use its perspective compression to stack the bluebells so they look more dense.

04 Watch the wind!

Your biggest enemy for this kind of shot is wind! A flower photographer has to really watch the weather forecast, not just for the light but also for anticipated wind gusts.

A longer lens and higher vantage point will help, but for the best images you need a calm day. When you want to use a low ISO and a narrow aperture, shutter speeds can get long; that’s why, on some days, a creative blur can be really helpful.

05 Creative blur

If you’re after creative blur, like our image on the previous pages, it helps to have tall, straight trees with little scrub and few branches on the trunk; a beech tree wood is ideal.

It’s best to be about 100 metres from the edge of the wood looking outwards, but this is dependent on the focal length of your lens.

You want enough trees to blur, but not so many that the image is cluttered. And if there are too few trees, they can look very thick and dark. Shooting towards the sun near the start or end of the day is best.


06 Exposure for blur


It’s good to bracket exposures from correct exposure (no flashing warnings) to about two stops over in one-stop increments.

The best image to blur is about 1.3 to 1.6 stops overexposed. This means that when you look at the image on the camera’s LCD with the overexposure warning switched on, the area between the trees will be flashing black and white, and the histogram will be towards the right-hand side with a large spike at the right.

Final Tip

If you’re shooting with side lighting, a polarising filter can really help to remove glare and perk up your colours.

If you have the opportunity, shoot just after it’s been raining: not only will the rain refresh the flowers; the sparkling wet reflections on the flowers can look great.

Also, be aware that the light filtering down through the canopy of leaves can create a green colour cast; setting White Balance to Auto may help, but setting a custom white balance will correct for the overabundance of green light, and will help you to retain the subtle blue tones of the flowers.

If you’re lucky enough to own a tilt-shift lens the shift adjustment can be used to do great pan-blurs without having to move the camera.

Water reflection techniques: how to increase the impact of your landscapes

Nothing can bring your landscape photography to life more than a sharp, stunning water reflection. In this tutorial we explain how to photograph a reflection and suggest several key techniques and tips for finding suitable subjects.

Water in its many forms is an integral part of landscape photos. One element that never fails to catch the eye is reflections: there is something magical about a reflection, transforming an ordinary scene into something special.

A water reflection not only adds another layer of interest to the photograph but it also introduces an element of depth.

There are many forms of reflections and many different ways to photograph them. One of the classic examples is a landscape with its reflection mirrored in tranquil water. This kind of image relies on shooting in flat, calm conditions.

Early morning is usually best, but check out the weather forecast the evening before and choose a location where the water is sheltered. Smaller, shallower pools provide the best chance of ripple-free water. Remember that it’s possible to create effective water reflection shots with just a puddle!

Most subjects with a perfect reflection make great pictures. These might include colourful autumnal trees, mountains, buildings in either rural or urban settings, harbours and boats.

The best time to shoot a water reflection


Shots taken in early morning light look fantastic when warm tones are reflected in the cooler colours of the shaded water. This differential lighting, where light is falling on the main subject but the water itself is in shadow, is very effective and often leads to dramatic images.

If you’re in a new location, use a compass or phone app to work out when the sun will come up, then place some calm water between you and the scene with the sun at your back.

Slightly rippled water can produce stunning results. Often the wind begins to pick up an hour or so after sunrise, creating small ripples across the surface. The distorted water reflection caused by the ripples adds a sense of intrigue to the picture and gives it more of an abstract feel.

This effect can be exaggerated by excluding the main subject from the picture and concentrating solely on the reflection. Lakeside trees work well with this treatment, and the effect is colourful during the autumn.

Water reflections don’t have to be of a grand landscape. For example, cutting out the sky from the picture can sometimes produce a much stronger image. Smaller aspects such as reeds and rocks also make good subjects when they are skilfully composed to include areas of colourful reflections in the water – from a blue sky or at sunrise or sunset.

This technique can work best when the foreground elements are in shadow. By then exposing for the brightest part of the water, the foreground is thrown into silhouette to create an image strong on shape and colour.

Shoot subjects plus their reflection or just the reflection – still water or ripples. If you add foreground interest such as rocks or a boat, there is no shortage of ideas to create pictures that pack a double punch. That’s something worth reflecting on…

Three must-know techniques for shooting a water reflection


Find the best light

Use low-angled sun to capture warmly lit reflections in the cooler tones of shaded water. Avoid bright overhead sun. Use early morning mist to add interest. On overcast days, eliminate the sky and its reflection from the picture by framing tightly.

Compose your shot

For a perfectly symmetrical reflection, break the rules and place the horizon bang in the middle of the frame. Alternatively, place the horizon on the upper or lower third to emphasise different parts of the picture. Focusing on a rippled reflection will create an abstract image.

Set your exposure

Using spot metering mode, take an exposure reading from a middle-toned area of the reflection. Set this exposure in manual, or lock the exposure. Use an ND grad filter to balance the exposure. Set an aperture of f/11 or f/16 to maximize depth of field, then focus on the water.

How to shoot a panoramic water reflection

When shooting landscape reflections, the image format ratio of 3:2 doesn’t always suit the subject. A panoramic format of around 3:1 can work much better. Simply crop your image in Photoshop.

Alternatively, stitch a series of frames together for a high-resolution panorama. Use a tripod and shoot successive frames with a 30% overlap.

Set the exposure in manual mode and focus manually for consistency. Use stitching software to form the composite panoramic.

Final tips for shooting water reflections successfully

Use a grad filter

Reflections are darker than the main subject, so you need to use a neutral-density graduated filter to balance the exposure. Make sure you line up the filter so that the darker part of the filter covers the subject, with the clear part over the reflection.

Reduce glare

Some reflections can be enhanced by using a polarising filter to reduce unwanted glare from the water surface. Rotate the filter until you see the best result – but be aware that sometimes the shot might be better without it.

Keep it level

When shooting reflections, avoid wonky horizons and sloping water by using a hotshoe-mounted spirit level – or use the one built into your camera if it has this function available. Always mount the camera on a tripod to keep it nice and steady.

Shoot low

Generally, the lower your shooting angle, the more of the reflection you’ll be able to see. Set your tripod up with the legs at minimum height, and shoot from the water’s edge. You’ll find that Live View is a good alternative to using the viewfinder.

Monday 19 May 2014

9 creative photo ideas to try in May

Creative photo ideas for May: 09 Shoot with a fisheye lens

Get started today…

* Fisheye lenses work differently on APS-C and full-frame cameras, so check the coverage you’ll get for your camera before buying.
* You get a very wide field of view with fisheye lenses, so you need to ensure that your feet, your shadow or your tripod don’t end up in the bottom of the shot.
* With so much field of view, often including the sun and masses of sky, fisheye images can suffer from too much contrast. You can’t fit ND grad filters to fisheye lenses, so shoot in raw so you can adjust exposure later (or combine several different exposures).

Saturday 17 May 2014

9 creative photo ideas to try in May

Creative photo ideas for May: 08 Shoot pedestrians with slow shutter speeds

Get started today....

* Pick your spot – somewhere not so busy that you end up shooting a mass of blurred people. Shoot in raw so you have maximum latitude for fine-tuning colour and white balance.

* Your camera may have built-in image stabilisation to help keep the background sharp, so turn it on.

Friday 16 May 2014

6 clever ways to get better lighting from your camera’s pop-up flash

Most entry- and enthusiast-level cameras come with a pop-up flash, which though not especially powerful, can come in very handy. In this tutorial, we will show you six built-in flash techniques than can help you get the better results from this often overlooked and somewhat maligned feature.

Built in flash techniques: 01. Fill-in


One of the most important lessons that you can learn about flash is that it’s not just for use when it’s dark, it can really boost your daylight images as well.

A little fill-in light can bring images to life, especially portraits, by adding a little sparkle and lifting dark shadows.

The first step is to pop-up your camera’s flash and set it to Fill-in, Forced or Flash-on, this tells it to fire even if the exposure system thinks that there’s enough light without it.

In many cases your camera will now ensure that the shutter speed is within the flash and camera’s sync range, often slower than 1/125sec, but sometimes 1/250 or 1/60sec — your manual will say.

If the camera doesn’t automatically set a suitable shutter speed you’ll need to adjust it manually and then you’re good to go.

Fill-in light is especially useful with back-lit subjects as it enables you to record some detail in the bright surroundings as well as the subject that’s in shadow.

And on bright sunny days it allows you to place your subject in shade so that their eyes aren’t screwed up against the sun.

Built in flash techniques: 02. Use flash exposure compensation


Flash exposure can be varied just like the overall exposure, however, instead of using the exposure compensation control you need to use the Flash Exposure (FE) compensation control.

This will increase or decrease the flash output depending upon what you dial in.

It’s worth noting that with modern TTL (through the lens) metering systems the exposure is adjusted above and below what the camera considers to be correct.

Flash exposure compensation is a very useful feature that helps to balance flash power with the ambient light, which means it’s great when you’re using fill-in flash mode.

Built in flash techniques: 03. Diffuse


Because the on-camera flash is a relatively small source of light it can be very harsh, potentially creating unpleasant highlights and deep shadows.

This is easily rectified by diffusing the light to make it softer.

There are lots of on-camera flash diffusers available on the market, or you can make your own with a strip of translucent white plastic, from a milk container, for example — although this can have an impact on white balance.

Even a piece of greaseproof paper or tissue can be used in an emergency.

Another possible option is to bounce the light from the flash off the ceiling. You’ll need a small rectangle of white card or something similar that can be held in front of the flash and angled up towards the ceiling.

The light will hit the card and bounce up to the ceiling from where it bounces down onto the subject.

This gives your subject nice soft light from above, creating a natural look. It’s essential that the ceiling is white otherwise the light will be coloured and look unnatural when it hits your subject.

As on-camera flashes aren’t especially powerful it won’t work with very high ceilings.

Diffusing and bouncing the flash effectively reduces its power, so your subject may need to be closer or the camera’s sensitivity set a little higher.

Built in flash techniques: 04. Use red-eye reduction


One of the problems with using on-camera flash is that the light is very close to the lens and this means that there’s a high probability of light bouncing off the back of the eye and into the camera, creating the well-known red-eye effect.

However, most cameras have a red-eye reduction mode to help tackle this problem.

This works by firing a pre-flash before the exposure so that the subject’s pupils close down to reduce the amount of light that can enter them.

In many cases this will significantly reduce the problem, however, if you have an image that still exhibits the phenomenon it can be dealt with quickly and easily in most image editing software packages.

Diffusing or bouncing the flash will also help reduce the likelihood of red-eye.

Built in flash techniques: 05. Slow-sync


Although a burst of light from your camera’s pop-up flash will illuminate your near-by main subject, it’s power falls off quickly and the background will not receive a significant amount of light.

This means that you can wind up with a brightly lit subject in front of a dark background.

However, if you extend the exposure time the brightness of the background will increase without over-brightening the subject – although you may find that you need to adjust the flash exposure compensation a little.

This technique of using a slower shutter speed with flash is known as slow-sync. It’s useful for injecting life into the subject and separating it from the background.

Although the subject will be frozen by the flash, the long exposure for the background may mean that the camera needs to be on a tripod to prevent it from being blurred.

However, if you pan with the subject it can be rendered sharp by the flash while the background is blurred.

Built in flash techniques: 06. Second curtain flash


In its default set-up a flash will fire at the beginning of the exposure.

On many occasions this is fine, but if you are shooting a moving subject and using a shutter speed that doesn’t freeze it, there will be a ghostly image of the subject visible where it moved after the flash fired. It can look as if the subject is moving backwards.

However, if the flash is set to second-curtain mode, it will fire at the end of the exposure and the blurred movement will be seen behind the subject giving a greater sense of speed and a more natural looking result.

Second-curtain flash is often combined with slow-sync to accentuate movement and create dynamic images.

9 creative photo ideas to try in May

Creative photo ideas for May: 07 Shoot with your smartphone on city breaks

Get started today....

* Keep your smartphone in a jacket pocket you can access quickly so the moment isn’t lost.
* Get as close as you can – smartphone image quality quickly degrades once you use zoom.
* Don’t just blindly rely on image processing apps – if you want to apply a retro effect, think about scenes that are specifically suited to that aesthetic before shooting.

What is aperture: everything you need to know about controlling light creatively

What is aperture in photography? It’s one of the fundamental elements of any picture, if not the most important camera setting you’ll make. Controlling the amount of light that hits your camera’s sensor isn’t the only role of that big hole in your lens. It also enables you to get creative with depth of field.

In this tutorial we’ll not only answer the question of ‘What is aperture’; we’ll show you how to use your camera’s aperture to start getting creative with light.

So what is aperture exactly?

Put simply, the aperture is a hole in the lens that light passes through to reach your camera’s imaging sensor. You use aperture, shutter speed and ISO in combination to create an exposure.

Aperture’s role in this mix is to control how much light reaches the sensor. With the exception of a very few ‘fixed aperture’ mirror lenses, all camera lenses allow you to change the size of this hole so that more or less light can pass through it.

Why would I want to alter how much light reaches the sensor?

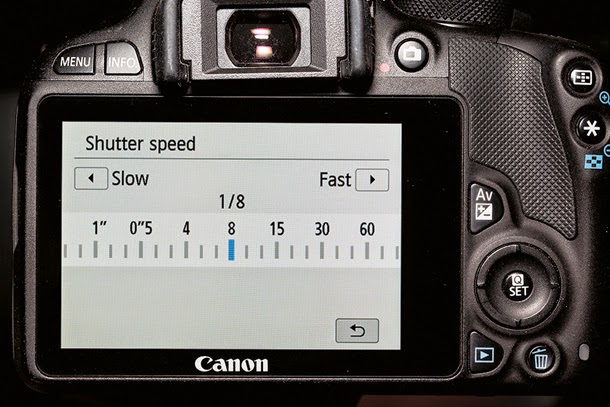
Well, let’s look quickly at the other elements of exposure: shutter speed and ISO. The choice of shutter speed dictates how long the camera sensor is exposed to the light that passes through the aperture.

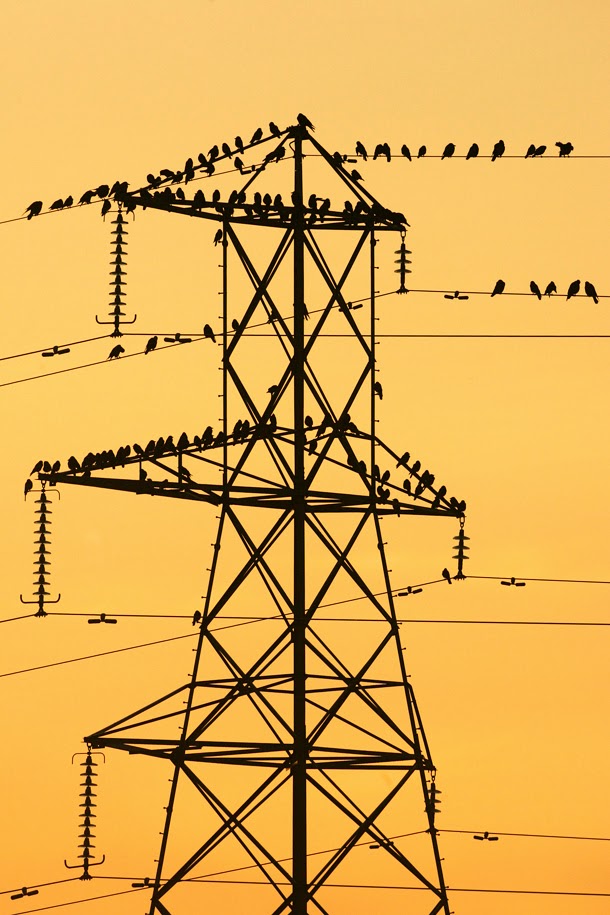
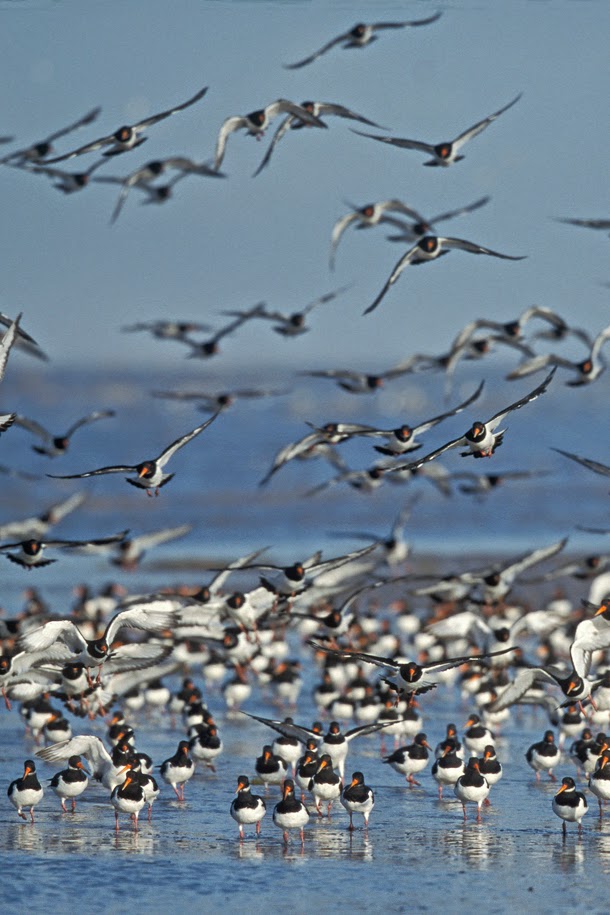
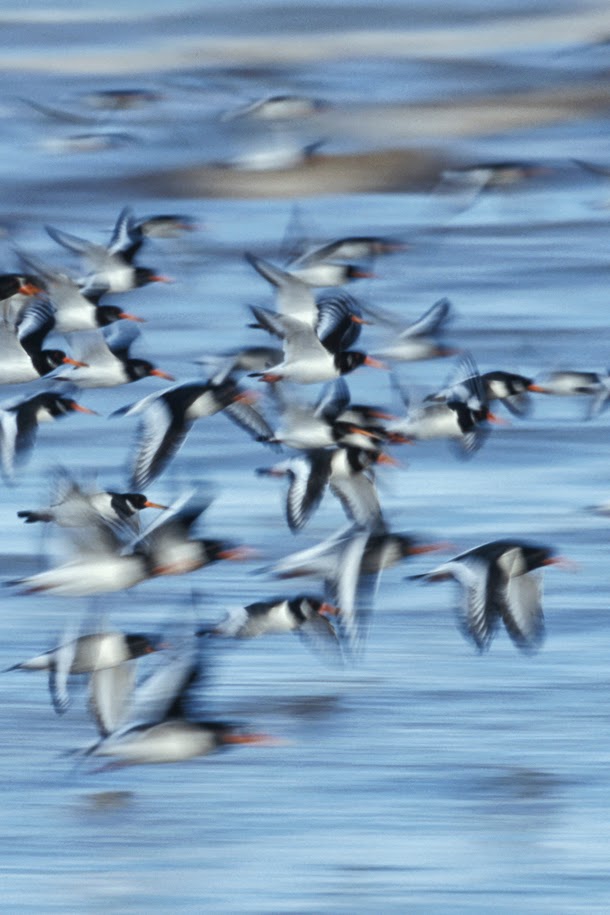
It also has a bearing on how movement is captured in your shots; faster shutter speeds enable you to freeze it, while slower shutter speeds allow you to add ‘motion blur’ for a more artistic result.

If lighting conditions and the camera’s ISO setting – which determines how sensitive the sensor is to light – remain constant, then the only way to ensure the sensor receives enough light to make consistent exposures as the shutter speed increases and decreases is by opening and closing the aperture.

As shutter speed gets faster (creating a shorter exposure time), the aperture needs to become wider (to increase the intensity of light).

As shutter speed gets slower (creating a longer exposure time), the aperture needs to become smaller (to reduce the intensity of light). It’s all a question of balancing these two elements.

I’ve heard photographers talk about using ‘wide’ and ‘small’ apertures – what do they mean?

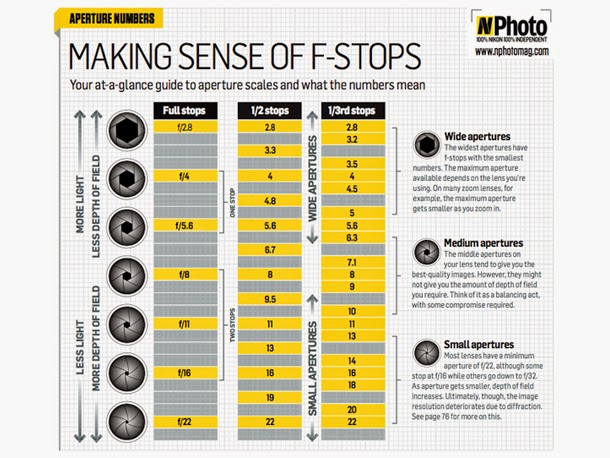
Those terms refer to the size of aperture being used. It’s a bit confusing, because the widest apertures correlate to the smallest f-stop numbers (such as f/2.8 and f/4).

However, when a photographer says they’re using a ‘small aperture’, they actually mean they’re using f-stops with the highest numbers (f/16, f/22, and so on).

If you think of the aperture as a fraction instead of an ‘f-stop’, it makes more sense.

For example, 1/4 is bigger than 1/16, so an aperture of f/4 will let more light in than f/16.

As well as affecting exposure, your choice of aperture also gives you control over the depth of field in an image – and this is one of the most potent weapons in the creative photographer’s arsenal.

Depth of field…?

OK, think of depth of field as a zone that extends in front of and behind the point of focus in which elements still appear acceptably sharp.

By reducing the depth of field, you can make a precise part of a shot appear in sharp focus and allow other areas to become blurred.

This enables you to draw attention to key parts of the image, and conceal elements that might otherwise prove distracting.

Increasing the depth of field, conversely, has the opposite effect, making more ‘layers’ in a scene appear sharp.

While depth of field in a photo is influenced by several factors, including focusing distance and focal length of the lens, in terms of aperture selection it boils down to this: the wider the aperture you use, the less depth of field you capture; the smaller the aperture you use, the more depth of field you capture.

Or to put it another way, big holes equal more background blur, small holes equal more sharpness.

So, when would I need to take control of the aperture?

The choice of aperture is the most important consideration for a whole range of shooting situations.

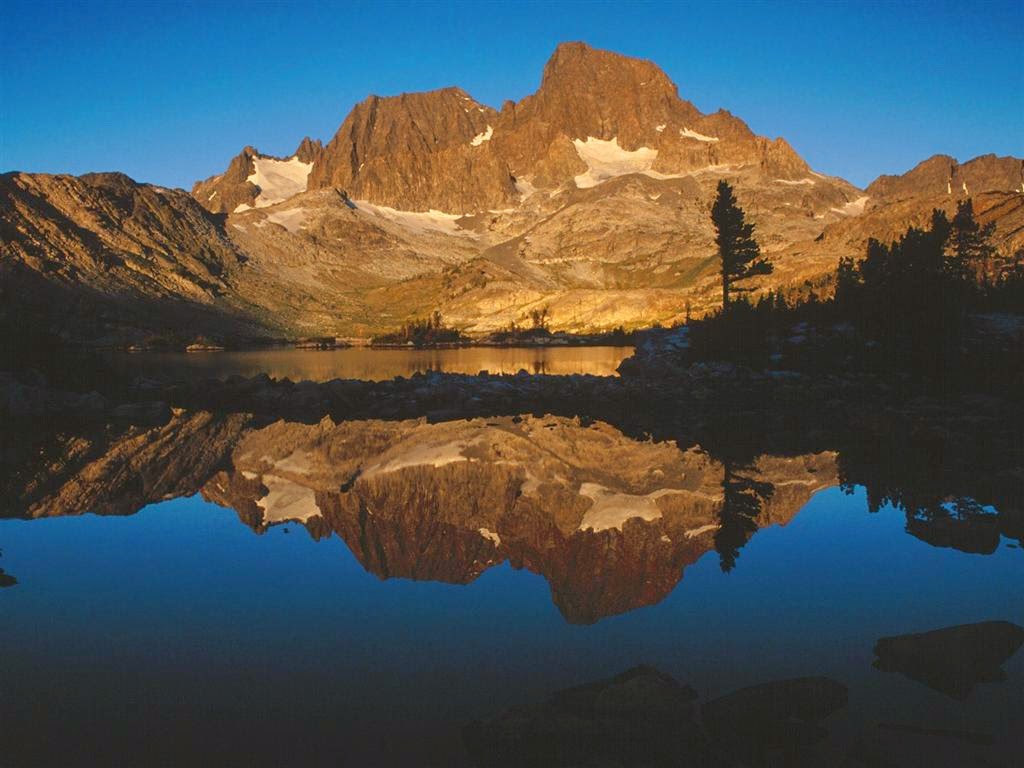
For instance, landscape photographers typically use small apertures with wide-angle lenses to give their pictures as much depth as possible.

That’s how they achieve those detailed scenics in which all the elements, from flowers at their feet to mountains on the horizon, are rendered pin-sharp right throughout the frame.

Portrait and wildlife photographers frequently opt for the other end of the scale, using long lenses and wide apertures to sandwich a sharp subject between blurred foreground and background.

Aperture becomes even more of a crucial consideration as you get close to a subject. The nearer you focus, the less depth of field will be captured for a given aperture.

This is why macro photography requires the use of precise focusing and very small apertures, as depth of field can often be measured in millimetres.

I should use Aperture Priority mode all the time then, right?

When control over depth of field is important to an image, then yes, choose Aperture Priority (A or Av on your camera’s mode dial). It’s an auto exposure mode that enables you to manually choose an f-stop, with the camera selecting a corresponding shutter speed to achieve what it calculates as a good exposure, based on the aperture you’ve selected, metering mode, ISO and so on.

Although you can rely on Aperture Priority for day-to-day photography, you have to be mindful of how changing the aperture affects shutter speed.

You might, for example, select a small aperture when shooting a landscape, but if the exposure time then runs into seconds, you’ll need to support the camera on a tripod.

So is there an optimum aperture I should use?

The middle aperture range for your lens – usually from f/8 to f/11 – provides a good balance of depth of field and shutter speed.

Crucially, most lenses tend to deliver optimum quality images at these aperture settings, too (see box above).

Although lenses are classified using a fixed range of apertures, not all lenses are equal.

There’s a reason that a 50mm f/1.8 lens costs around £130, while a 50mm f/1.2 lens might set you back ten times that amount, at £1,300 – and that, in essence, is lens speed.

When photographers describe a lens as being ‘fast’ or ‘slow’, they’re not referring to the agility of its autofocus system, but rather how wide its maximum aperture is.

Fast lenses offer wide apertures that let more light in, giving you a faster shutter speed to work with.

They’re sought after for low-light work, exaggerated shallow depth of field effects and photography that frequently requires blazingly fast exposure times, such as wildlife and sports photography.

Slow lenses don’t capture as much light, so exposures require a slower shutter speed.

They’re usually lighter in weight than fast lenses though, and considerably kinder on your wallet.

So, a 10-20mm f/3.5 lens is faster than a 600mm f/4?

Ah, no. A lens is referred to as being fast or slow when it’s compared to lenses that have a similar focal length.

For its extreme focal length, a 600mm f/4 lens is fast, whereas a lens offering a maximum aperture of f/3.5 at 20mm is relatively slow; there are 20mm lenses available with faster maximum apertures of f/2.8 and f/1.8.

Many zoom lenses feature a ‘floating aperture’, so the maximum aperture changes as you zoom.

A 100-400mm f/4.5-5.6 lens offers f/4 as a maximum aperture, but this gradually narrows to f/5.6 as the lens is zoomed to 400mm.

Zoom lenses with floating apertures are generally slower and cheaper than zooms that maintain the same maximum aperture throughout their range.

If you need the fastest maximum apertures going, then you’ll be looking at high-quality prime lenses, rather than zooms. Start saving now…

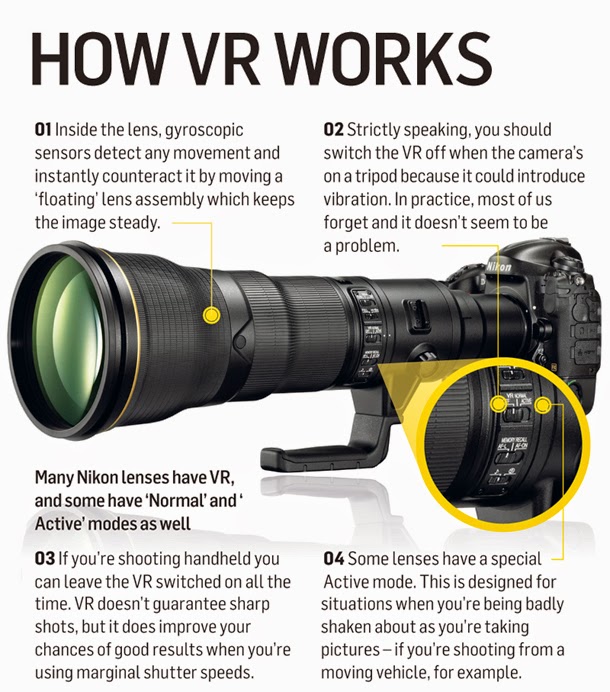
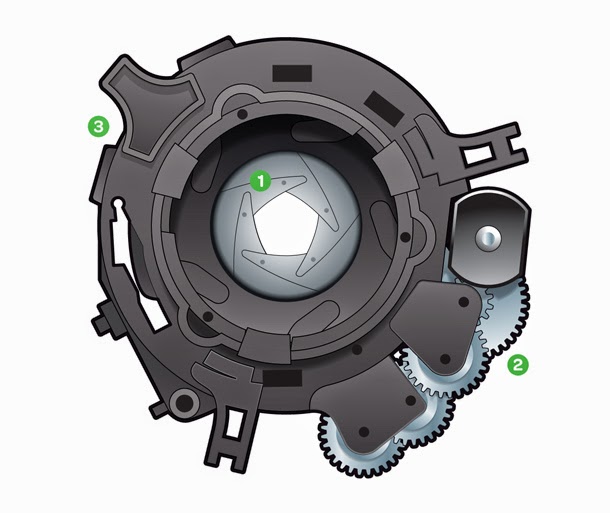
What is an aperture made of?

01 Blades

The aperture diaphragm is made up of between five and nine interleaved blades.

The more blades that are used, the smoother and more circular the ‘bokeh’, or out-of-focus areas, appear.

This opens and closes the aperture when the shutter fires, to ‘stop down the lens’ to the aperture you’ve selected.

By default, lenses show the view through the maximum aperture in the viewfinder.

02 Motor

This opens and closes the aperture when the shutter fires, to ‘stop down the lens’ to the aperture you’ve selected. By default, lenses show the view through the maximum aperture in the viewfinder.

03 Location

The aperture assembly doesn’t sit in your camera, but rather in the barrel of each of your lenses.

The range of aperture settings available varies depending on the particular lens being used.


How to control aperture

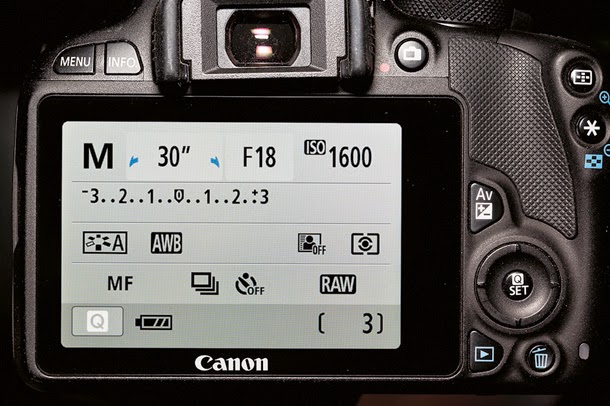
Manual exposure gives you total control over both aperture and shutter speed, but it can be a fiddly system when you’re just starting out.

Aperture Priority (A or Av) is a semi-automatic exposure mode that, as the name suggests, enables you to set the aperture as a priority.
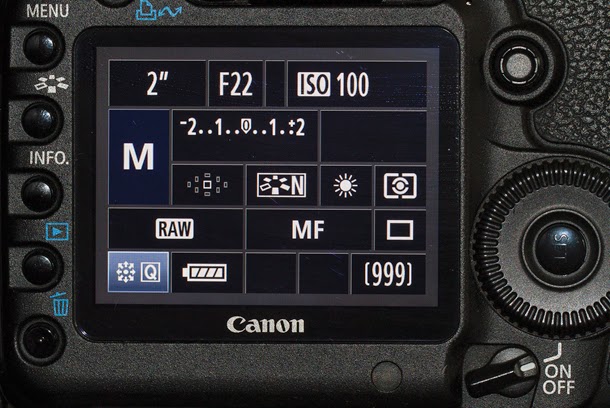
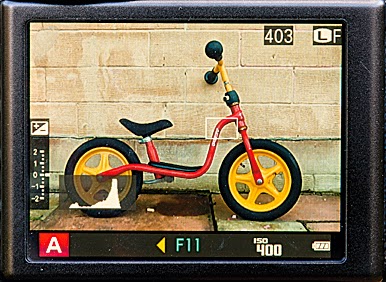
Step 1


The easy way to control aperture yourself is by selecting A/Av mode on the Mode dial. Then simply rotate your camera’s main input dial to increase or decrease the aperture setting. The camera will automatically adjust the shutter speed as you do so.
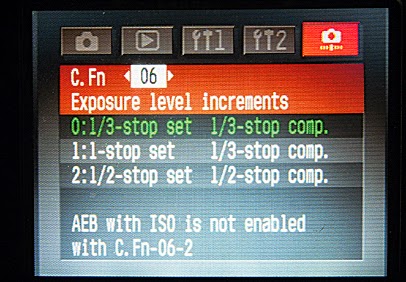
Step 2


Digital SLRs offer a choice of up to three aperture scales, with full-stop, half-stop or third-stop increments (head to your camera’s Custom Functions menu to choose your preference). We prefer third stops as it enables fine-tuning of exposure.
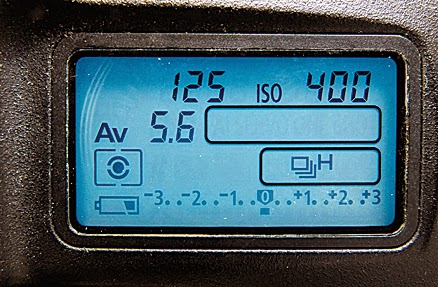
Step 3

There are three ways to keep track of the aperture setting – in the viewfinder, on the rear LCD screen and, in the case of high-end DSLRs, on the small top-plate LCD screen. We like the clarity that a top screen and the viewfinder provide.

Step 4


Many cameras have a Depth of Field Preview button that closes the aperture down to the setting you’ve chosen, enabling you to gauge the depth of field through the viewfinder. However, Live View offers a more effective representation of the aperture setting.

Why a small aperture isn’t always best

Most lenses have a minimum aperture of f/22, although some (such as macro lenses) offer an even smaller setting of, say, f/32.

But why is the minimum aperture rarely listed alongside the focal length, as its maximum aperture is?

This is because the smallest aperture is rarely recommended to be used, as this setting leads to softer, lower contrast images caused by an optical phenomenon known as diffraction.

Diffraction occurs when light waves entering the lens are ‘bent’ by the hard edges of the aperture blades.

Every aperture setting causes this, but the bending is generally minimal. However, as the apertures get smaller, the effect becomes more significant.

At the smallest aperture, the light waves are bent and spread out so much by the aperture blades that the image appears fuzzy, even though it’s focused correctly.

So, while a lens’s smallest aperture might enable you to maximise the depth of field when you’re photographing landscapes, the resolution will deteriorate.

Try shooting at f/16 instead to improve overall picture quality.

What are f stops?

Dial through the f-stops in Aperture Priority mode and the sequence of numbers that appears in the viewfinder can appear quite random.

Why does f/5.6 jump to f/8 when you close the aperture by one full stop, then from f/8 to f/11 to f/16 and so on? There seems to be no logic to it.

How these numbers are calculated is actually pretty complicated, but the thing to bear in mind is that an f-stop isn’t a measurement of the diameter of the aperture, but an expression of the ratio between the diameter of the entrance pupil and the focal length.

This means that aperture values are constant no matter what lens is in use.

For instance, an 80mm lens with an aperture setting of f/4 will have a pupil diameter of 20mm (80÷4), whereas a 400mm lens with an aperture setting of f/4 will have a pupil diameter of 100mm (400÷4).

While the 400mm has a considerably larger pupil, it lets in exactly the same amount of light as the same f/4 aperture does on the 80mm lens, because the light is much dimmer by the time it has travelled the length of the lens.

Thursday 15 May 2014

What is shutter speed: 7 questions new photographers always ask

What is shutter speed? In this quick primer we’ll explain how to use shutter speed to make your exposures faster or slower for instant photographic creativity.

What is shutter speed and what does it do?


Shutter speed is a measure of how long your camera’s sensor (the digital equivalent of film) is exposed to light.

Most DSLRs use a mechanical shutter to control this. When you press the shutter release button or use the camera’s self-timer function, the blades that block the sensor open and close, letting light in.


How long should the shutter be open?


It depends on the amount of light that’s available. Typically, lower light levels demand longer shutter speeds while brighter conditions require much shorter shutter speeds to make an exposure.

Significantly, the choice of shutter speed also has an impact on how movement is recorded in the picture.

The longer the shutter is open, the greater the likelihood there is of any movement being blurred.

As a rule, you’d use the fastest shutter speeds for fast-moving subjects, to stop the motion and make sharp pictures. But rules are meant to be broken!

You can select from a much wider range of shutter speeds than the one suggested by the camera.

What do you mean?


Say you’re shooting action, such as a horse galloping or a car on a race track. To get a sharp shot, you may need a shutter speed close to 1/1,000 sec or 1/2,000 sec.

Freezing the action this way might reveal detail you’d miss with the naked eye, but it can also rob a scene of its sense of speed.

Using a slower shutter speed would allow the shutter to stay open for longer, and some of the moving parts to become blurred – an effective technique for action photography when combined with ‘panning’.

By moving the camera so the subject stays more or less in the same position within the frame, it will remain sharp, while the moving background will be rendered as a blur.


How do I know which shutter speed will produce the best effect?


It depends on the speed at which the subject is moving. It’s often a fine line between the perfect blend of blur and sharpness, and something that looks like a mistake.

That galloping horse? You can probably get away with 1/50 sec for a panned shot, but a Formula One car would still need a nippy ‘slow’ shutter speed in the region of 1/500 sec for a similar degree of blur.

A monopod or an image-stabilised lens helps to support the camera at these lower speeds, ensuring a smooth pan in one direction.

If you’re using very slow shutter speeds, you’ll get better results with a tripod – and in many cases, it’s a necessity.

When would I use very slow speeds?

Landscape photographers typically use long exposures that last for multiple seconds, even many minutes.

This is often the trade-off that comes from using small apertures to increase the depth of field and sharpness in a scene.

Remember that making an exposure is a balancing act between shutter speed, aperture and ISO: as one increases, one of the other two settings has to decrease to maintain the same exposure level.

However, a long exposure can transform a lifeless landscape. Moving water, whether it’s a waterfall, river or waves, will melt into a milky white blur, while trees and flowers blown by the wind add a painterly quality to pictures.

The shutter speeds required to achieve these effects depend on how much light there is and how fast the element is moving.

The strength of the effect is largely a matter of taste too, but anything from 1/15 sec to 10 seconds will produce interesting results.

To achieve exposures as long as this in daylight may require the use of filters on the lens.

What filters do I need?

Neutral-density filters. These dark grey filters block the amount of light entering the lens and are available in a range of different strengths, each enabling the use of progressively slower shutter speeds.

Very strong ND filters, combined with small apertures and low ISO sensitivities, enable the use of shutter speeds that stretch for minutes, even in the middle of a clear summer day.

They’re routinely used to create minimalist long-exposure coastal pictures in which a rough sea resembles a polished ice rink.

Of course, if you’re shooting at night you may not need a filter at all, as exposures will be naturally be much longer.

The longest shutter speed available in Shutter Priority is 30 seconds. Where’s the ‘minutes’ option?

To go beyond 30 seconds, you’ll need to use your camera’s Bulb exposure mode.

On most cameras you can access this via the B setting on the mode dial, or by scrolling past the 30 second mark in Manual exposure mode until ‘Bulb’ appears on the display.

In Bulb mode, the shutter stays open for as long as you keep the shutter release button depressed.

It’s best to use a remote release to do this, as pressing the button on the camera for minutes at a time isn’t very practical.

At night, you can use Bulb mode to photograph star trails, firework displays and moonlit landscapes. It’s also the mode of choice for shots taken with very strong ND filters.

Which shutter speed is best?

Very slow shutter speed

A shutter speed of over a second can be used to show the effects of wind on foliage and water, or to create abstract blurs using intentional movement.

To achieve a slow enough shutter speed, you’ll need to use smaller apertures and lower ISO settings.

Shooting when light levels are lower, early in the morning and late in the evening, will help, although you may need to use an ND filter to reduce exposure time in bright conditions.

Slow shutter speed

To inject a sense of motion into panning shots, use a slow shutter speed, relative to the speed of the subject.

Here we needed a shutter speed of 1/25 sec to render the fast-moving rotor blades as a blur, while keeping a good level of sharpness in the rest of the image as we moved the camera to track the helicopter.

We were working in Aperture Priority mode, and had to dial in a small aperture of f/14 to achieve the effect.

Fast shutter speed

To completely freeze movement, you’ll need a fast shutter speed. Particularly fast-moving subjects may require shutter speeds of 1/1,000 sec or faster; to achieve this, you’ll need plenty of light, wide apertures and high ISOs.

Capturing the ripples here required an exposure of 1/400 sec at f/8.

A slower shutter speed would have meant too much blur, while a faster speed would have meant using a wider aperture and reduced depth of field.

How to control shutter speed?

Use Shutter Priority

Shutter Priority mode gives direct control over the shutter speed, with the camera selecting an appropriate aperture to produce a balanced exposure. Turn the mode dial to S or Tv, and rotate the control dial to select the duration of the exposure.

Check the setting

As you rotate the control dial, check the shutter speed in the viewfinder or on the display. The typical range is from 30 seconds to 1/4,000 sec; you’ll need plenty of light, a large aperture and a high ISO setting to achieve the fastest speeds.

Going slower


You can set a specific shutter speed in Manual, although you’ll need to set the aperture too. Even then, the slowest shutter speed available is 30 seconds. To go slower, use Bulb mode and press the shutter release for the desired length of time.