Want to avoid some of the more common mistakes made by photographers? In their latest guest post the photo management and Canon Project1709 experts at Photoventure came up with the 6 camera settings that many get wrong along with some advice on how to get it right.

Common mistakes with camera settings: 1. White balance
The vast majority of photographs are taken with the camera’s white balance set to the Automatic option.
It’s an easy choice that gets it right most of the time, but it’s not completely foolproof and many systems have a tendency to correct natural variations in light colour so that images look a bit too neutral.
Warm early morning or evening sunlight, for example, can be made too cold.
When shooting outdoors better results can be achieved in many cases by switching to the Daylight or Sunny setting.
It can even produce better results than the Auto setting in shady or overcast conditions.
Most cameras also have Shade or Cloudy white balance options that inject a bit more warmth into images.
In some situations this colour-shift can be excessive, but it’s worth experimenting with your camera to find out how each white balance setting performs in a range of conditions.
For the ultimate in control, use the Custom or Manual white balance option and set the value manually.
Your camera’s manual will explain exactly how to do this, but fundamentally it involves photographing a white or neutral grey target (a piece of card works well) in the same light as your subject and telling your camera to use this image to set the white balance.
If you photograph the white or grey card again after the manual white balance has been set in camera, you should see it rendered neutral.
If you wish, you can use your camera’s white balance adjustment controls to warm or cool the results – or experiment with a non-neutral calibration target.

Common mistakes with camera settings: 2. Sharpness
Most digital cameras allow you to adjust the level of sharpening that is applied to JPEG images as they are processed.
Some photographers assume that the highest setting is the best option as this will produce the sharpest images.
Unfortunately, it doesn’t always work like that and strong or high contrast edges such as a clean horizon can end up looking over-sharpened and having halos.
Conversely, using the lowest setting can leave fine details looking a bit soft – nevertheless, this generally looks better than over-sharpened edges.
The best way to get good results direct from the camera is to apply sharpening cautiously on an image-by-image basis – or at least use a mid-range setting for most shots.
However, those wanting the very best results should apply sharpening selectively to raw files post capture.
Common mistakes with camera settings: 3. Autofocus
Many photographers allow their camera to set the AF point for them because it’s a quick and convenient way of shooting.
However, most cameras assume that the subject is the nearest object and that it’s close to the centre of the frame.
While this may be fine much of the time, if you’re shooting an off-centre subject with lots of objects around it, the camera may try to focus on the wrong thing.
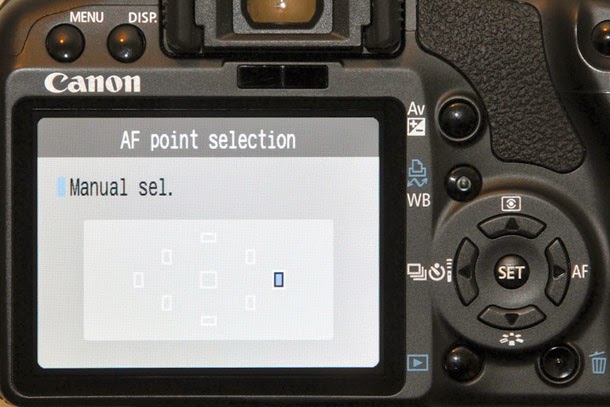
The solution is to take manual control over AF point selection so that you can position the active point over the correct subject.
Your camera manual will explain exactly which mode you need to use, but it’s usually called something like Single point AF or Select AF.
Once the correct mode is set, use the camera’s navigation controls to select the AF point that lies over your subject in the frame.
Occasionally you may find that there isn’t an AF point that lines up with the subject, in these situations employ the focus-and-recompose technique.
To do this simply select the central AF point (as it is usually the most sensitive), and move the camera so that it is over the subject.
Then half-press the shutter button so that the camera focuses the lens. Now, keeping your finger on the shutter release, recompose the shot.
Once you’re happy with the composition, push the shutter release fully home to take the shot.
Common mistakes with camera settings: 4. Flash sync
By default, cameras are set to fire a flash at the start of an exposure. This isn’t an issue with fast shutter speeds or when the subject and/or camera are motionless, but it can produce odd looking results with long exposures and moving subjects.
The problem is that a ghostly, blurred image of the subject is produced in-front of a correctly exposed, sharp version and this makes it look like it’s moving backwards.
The situation is easily resolved by delving into the camera’s (or flashgun’s) menu and activating the second-curtain flash option.
This will tell the flash to fire towards the end of the exposure so that any subject movement is recorded as a blur behind it rather than in front.
It makes the image look much more natural and can really emphasise the speed of the movement.
Common mistakes with camera settings: 5. Long exposure noise reduction
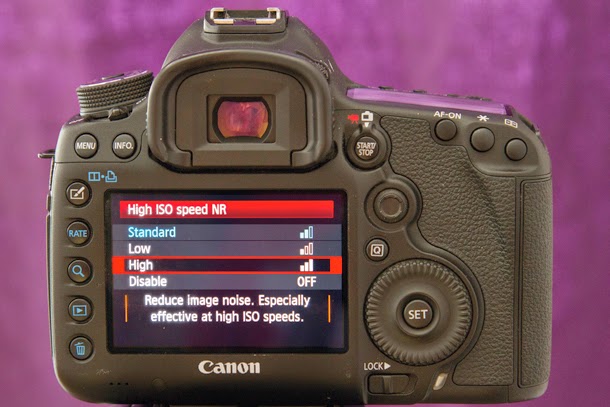
In-camera long exposure noise reduction works by taking a second ‘dark’ exposure immediately after the image has been recorded.
This dark image is taken with exactly the same exposure time as the first, but the shutter doesn’t actually open so no light reaches the sensor.
The idea is to record the non-random noise which is caused by variations in pixel sensitivity and hot pixels, and that becomes visible with longer exposures.
Because in-camera long exposure noise reduction effectively doubles the exposure time for each shot many photographers are tempted to turn it off – especially with exposures that are several minutes long.
However, the results of using it are well worth the wait.
It is possible to perform your own dark frame extraction using image editing software, but it is still advisable to shoot several dark frames throughout a shoot as the level of noise tends to increase as the sensor warms up during its heavy use.
The most foolproof approach is to use the in-camera system.
Common mistakes with camera settings: 6. Shutter speed
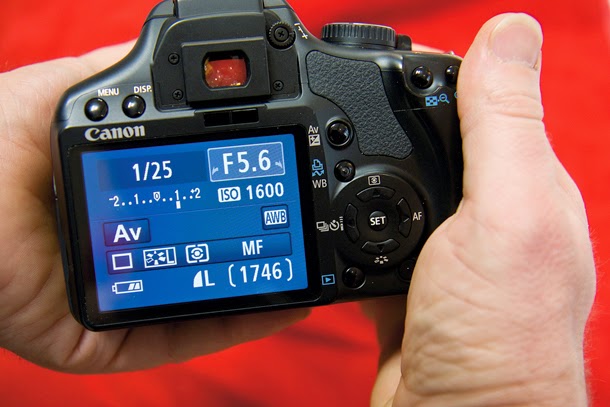
Many novice photographers overestimate their ability to keep a camera still and consequently shoot handheld with relatively long exposures.
A general rule for getting sharp images from a hand-held full-frame camera is to use a shutter speed that is at least one second divided by the focal length of the lens.
This means that if you are shooting with a 100mm lens, the shutter speed needs to be at least 1/100sec.
This rule can be adapted to work for sub-full-frame sensors by taking into account their focal length magnification factor.
For example, a 100mm lens on a Canon APS-C format SLR, like the EOS 700D, has a 1.6x focal length magnification factor, so the shutter speed would need to be at least 1/160sec.
Many lenses and some cameras now have image stabilisation systems built-in and this allows slower than normal shutter speeds to be used when the camera is handheld.
Some lenses now claim a 4EV compensation which enables the shutter speed to be reduced by up to 16x. That’s the difference between 1/125sec and 1/8sec.
Common mistakes with camera settings: 1. White balance
The vast majority of photographs are taken with the camera’s white balance set to the Automatic option.
It’s an easy choice that gets it right most of the time, but it’s not completely foolproof and many systems have a tendency to correct natural variations in light colour so that images look a bit too neutral.
Warm early morning or evening sunlight, for example, can be made too cold.
When shooting outdoors better results can be achieved in many cases by switching to the Daylight or Sunny setting.
It can even produce better results than the Auto setting in shady or overcast conditions.
Most cameras also have Shade or Cloudy white balance options that inject a bit more warmth into images.
In some situations this colour-shift can be excessive, but it’s worth experimenting with your camera to find out how each white balance setting performs in a range of conditions.
For the ultimate in control, use the Custom or Manual white balance option and set the value manually.
Your camera’s manual will explain exactly how to do this, but fundamentally it involves photographing a white or neutral grey target (a piece of card works well) in the same light as your subject and telling your camera to use this image to set the white balance.
If you photograph the white or grey card again after the manual white balance has been set in camera, you should see it rendered neutral.
If you wish, you can use your camera’s white balance adjustment controls to warm or cool the results – or experiment with a non-neutral calibration target.
Common mistakes with camera settings: 2. Sharpness
Most digital cameras allow you to adjust the level of sharpening that is applied to JPEG images as they are processed.
Some photographers assume that the highest setting is the best option as this will produce the sharpest images.
Unfortunately, it doesn’t always work like that and strong or high contrast edges such as a clean horizon can end up looking over-sharpened and having halos.
Conversely, using the lowest setting can leave fine details looking a bit soft – nevertheless, this generally looks better than over-sharpened edges.
The best way to get good results direct from the camera is to apply sharpening cautiously on an image-by-image basis – or at least use a mid-range setting for most shots.
However, those wanting the very best results should apply sharpening selectively to raw files post capture.
Common mistakes with camera settings: 3. Autofocus
Many photographers allow their camera to set the AF point for them because it’s a quick and convenient way of shooting.
However, most cameras assume that the subject is the nearest object and that it’s close to the centre of the frame.
While this may be fine much of the time, if you’re shooting an off-centre subject with lots of objects around it, the camera may try to focus on the wrong thing.
The solution is to take manual control over AF point selection so that you can position the active point over the correct subject.
Your camera manual will explain exactly which mode you need to use, but it’s usually called something like Single point AF or Select AF.
Once the correct mode is set, use the camera’s navigation controls to select the AF point that lies over your subject in the frame.
Occasionally you may find that there isn’t an AF point that lines up with the subject, in these situations employ the focus-and-recompose technique.
To do this simply select the central AF point (as it is usually the most sensitive), and move the camera so that it is over the subject.
Then half-press the shutter button so that the camera focuses the lens. Now, keeping your finger on the shutter release, recompose the shot.
Once you’re happy with the composition, push the shutter release fully home to take the shot.
Common mistakes with camera settings: 4. Flash sync
By default, cameras are set to fire a flash at the start of an exposure. This isn’t an issue with fast shutter speeds or when the subject and/or camera are motionless, but it can produce odd looking results with long exposures and moving subjects.
The problem is that a ghostly, blurred image of the subject is produced in-front of a correctly exposed, sharp version and this makes it look like it’s moving backwards.
The situation is easily resolved by delving into the camera’s (or flashgun’s) menu and activating the second-curtain flash option.
This will tell the flash to fire towards the end of the exposure so that any subject movement is recorded as a blur behind it rather than in front.
It makes the image look much more natural and can really emphasise the speed of the movement.
Common mistakes with camera settings: 5. Long exposure noise reduction
In-camera long exposure noise reduction works by taking a second ‘dark’ exposure immediately after the image has been recorded.
This dark image is taken with exactly the same exposure time as the first, but the shutter doesn’t actually open so no light reaches the sensor.
The idea is to record the non-random noise which is caused by variations in pixel sensitivity and hot pixels, and that becomes visible with longer exposures.
Because in-camera long exposure noise reduction effectively doubles the exposure time for each shot many photographers are tempted to turn it off – especially with exposures that are several minutes long.
However, the results of using it are well worth the wait.
It is possible to perform your own dark frame extraction using image editing software, but it is still advisable to shoot several dark frames throughout a shoot as the level of noise tends to increase as the sensor warms up during its heavy use.
The most foolproof approach is to use the in-camera system.
Common mistakes with camera settings: 6. Shutter speed
Many novice photographers overestimate their ability to keep a camera still and consequently shoot handheld with relatively long exposures.
A general rule for getting sharp images from a hand-held full-frame camera is to use a shutter speed that is at least one second divided by the focal length of the lens.
This means that if you are shooting with a 100mm lens, the shutter speed needs to be at least 1/100sec.
This rule can be adapted to work for sub-full-frame sensors by taking into account their focal length magnification factor.
For example, a 100mm lens on a Canon APS-C format SLR, like the EOS 700D, has a 1.6x focal length magnification factor, so the shutter speed would need to be at least 1/160sec.
Many lenses and some cameras now have image stabilisation systems built-in and this allows slower than normal shutter speeds to be used when the camera is handheld.
Some lenses now claim a 4EV compensation which enables the shutter speed to be reduced by up to 16x. That’s the difference between 1/125sec and 1/8sec.
No comments:
Post a Comment