Getting your camera out in public might seem daunting if you’ve never tried it before, but these five street photography projects will get you started right. Armed with our expert street photography tips, you’ll soon have the confidence to shoot everything from motion-blur abstracts to candid portraits of strangers.
You don’t need to travel to exotic, remote locations to get amazing image. There are plenty of subjects around almost every street corner; you just need to be able to find them.
The very familiarity of your local town or city can mean that it’s all too easy to miss the host of potential photos available on the streets close to home.
So here are five easy street photography projects to help spark your creativity, give you some ideas of great subjects to look for and the right techniques to use for the best results.
The advantage of this approach – apart from the fact that it means you don’t have to approach a complete stranger – is that it can result in much more ‘candid’ shots, with natural behaviour and expressions.
Alternatively you can get in much closer, with a wider lens. It is more difficult to get candid results from closer to the subject, as they will be much more likely to react to the camera.
But if you take the time to engage with your subject – by haggling for some produce at market stall, for example – it can give a more intimate and personal feel to your images than shooting from a distance.
In either case, it’s a good idea to use Aperture Priority mode – that way, all you have to do is set the aperture – the camera will then work everything else out automatically, leaving you free to concentrate on framing, composition and so on.
Whether you’re shooting from near or far, you definitely don’t want to waste precious seconds fiddling about with camera settings.
The only thing you do need to keep an eye on is the shutter speed. If it becomes too slow to shoot handheld at the aperture you’ve set, you may need to up the ISO.
As a rule of thumb, if you’re shooting in sunny conditions, an IS0 of 100 or 200 is probably fine, but if it’s a bit overcast or very early or late in the day, you may need to up it to 400 or even 800.
The good news is that you can check this by shooting something as simple as your hand held out in front of you – so long as the lighting stays fairly constant, you can then set the ISO and forget all about it, which again means not getting bogged down in settings while you’re actually shooting.
The main thing to watch out for is how people react to the camera. Don’t be confrontational, but also don’t skulk around in the shadows, as both approaches can cause problems.
Just be open and reasonable when dealing with people, and don’t push your luck if someone objects to you taking their picture.
For both distant and close-up candids, it also helps to take lots of pictures of other things first – this not only makes people aware of your camera, but also gives the impression that you’re interested in shooting everything around you, not just them (even if you’re not!).
This has the added advantage of making them feel less self-conscious, which will result in more natural-looking portraits.
Cities are vibrant, colourful and multi-textured, and a good way to capture this colour and texture is to seek out and photograph street art…
Approaching the shot
Finding suitable subjects is half the battle when looking for signs and graffiti, but once you’ve found them the viewpoint is the main decision you have to make.
The main factor in this is the background – if there is a suitable backdrop you can shoot along the street, to include the surroundings.
The alternative approach, especially if the surroundings aren’t photogenic, is to shoot the subject head-on.
Recommended lens
A standard 35mm or 50mm lens is great for shooting signs and graffiti. These tend to offer a wide maximum aperture for isolating different areas of the image (by blurring out foreground and background) and also have very little distortion, so that areas at the edges of the image remain straight, rather than curved.
Essential settings
When including the street as a backdrop you will need to decide whether to blur the background or keep it sharp, so as with portraits, the aperture is the key setting you need to control when shooting signs and graffiti.
You should choose a wide aperture to blur out the foreground and background, but remember that you’ll usually need to keep most of the main subject sharp, too.
A setting like f/4 or f/5.6 is usually a good compromise.

Things to watch out for…
Best street photography projects: 03 Macro details
As with nature photography, getting up close can give you a whole new perspective on familiar subjects
Approaching the shot
It can take a while to get your ‘eye’ in when shooting small details and macro images, so once you’ve found a location with some potential subjects, it’s worth spending some time simply exploring different viewpoints and subjects to help you get used to looking at the world in miniature.
Recommended lens
To get really close to the subject you’ll need to use a dedicated macro lens, but for larger details a standard 30mm or 50mm lens will work fine.
Essential settings
To keep control of the depth of field you should shoot in Aperture Priority (a or Av) mode, then choose a wide aperture, such as f/4, to isolate the subject and blur out the background.
You will also find that manual focusing will give more reliable and consistent results than relying on autofocus.
If you’ve got time, it’s well worth using a tripod, as this will enable you to position the point of focus, and frame your shot, very precisely.
As with candid portraits, if you’re not using a tripod you’ll need to keep an eye on the shutter speed.
Things to watch out for…
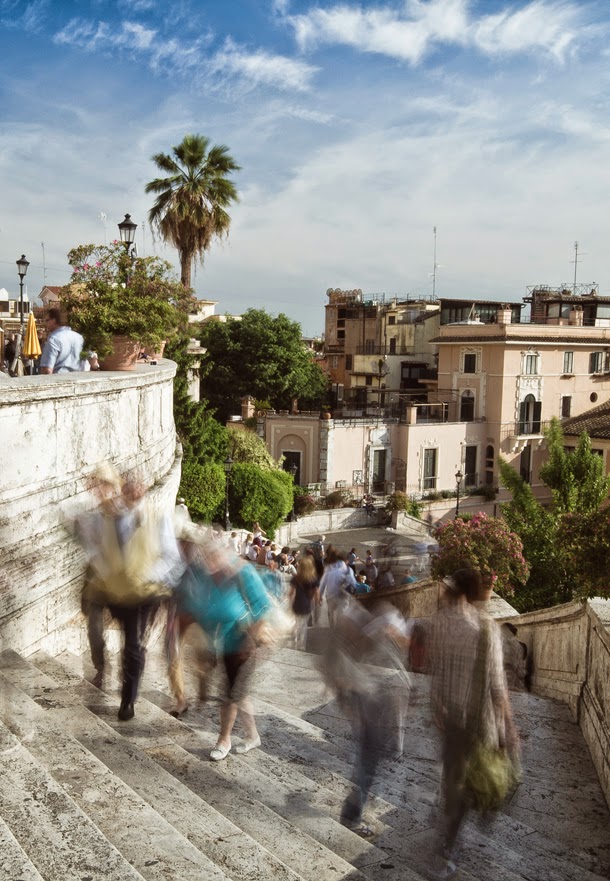
Best street photography projects: 04 People and traffic
Cities are invariably busy, bustling places, and there’s no better way to capture this than by slowing everything down…
Approaching the shot
To achieve this effect you’ll need to use long shutter speeds, so ideally you’ll need to use a tripod.
Setting up a tripod on a busy street can be difficult, so try to find a fairly quiet area where you still have a view of a busy street or walkway, to keep you and your kit safe.
It’s also worth looking out for elevated vantage points, such as bridges or balconies, as looking down on a road or walkway is a great way to ensure cleaner, less distracting backgrounds than shooting at street level.
Recommended lens
The wide end of a standard zoom is perfect for this style of shot, although you can also try shooting with a longer lens for more distant subjects, or even an extreme wide-angle in confined spaces.
Essential settings
You’ll need to choose a shutter speed that will allow you to blur the movement of the subjects in your particular scene, but still keep them recognisable in the image.
You can use Shutter Priority (S or Tv) mode, but if you will get more consistent results by using manual exposure.
For slow-moving subjects like people walking, begin with a shutter speed of around 1/4 sec, while for fast-moving subjects such as cars, trams or buses, a shutter speed of 1/15 sec is a good starting point.
Things to watch out for…
The success of this style of shot relies on the balance between the blurred and sharp areas in the frame, so try to ensure the background is clean enough that your blurred subjects will stand out against it (such as a plain pavement or road).
It also helps to to include at least one easily recognisable sharp element in the scene.
In bright light conditions it may not be possible to achieve the slow shutter speeds necessary for blurring some subjects.
In these situations you’ll need to use either a plain neutral density filter or a polarising filter to reduce the amount of light reaching the sensor.
This in turn will enable you to set a slower shutter speed.
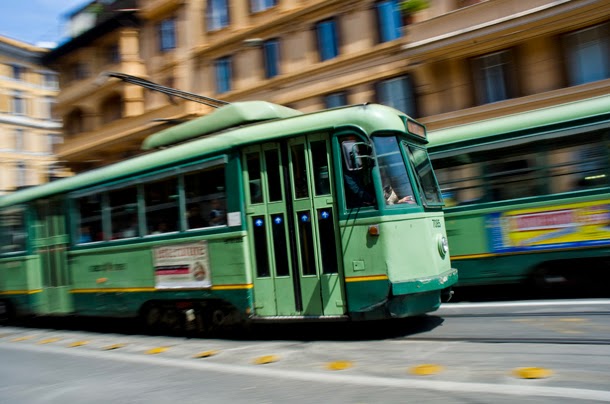
Best street photography projects: 05 Panning
As with sport, there’s no better way to capture the speed and energy of a moving subject than by panning…
Approaching the shot
Recommended lens
Essential settings
Things to watch out for…
You don’t need to travel to exotic, remote locations to get amazing image. There are plenty of subjects around almost every street corner; you just need to be able to find them.
The very familiarity of your local town or city can mean that it’s all too easy to miss the host of potential photos available on the streets close to home.
So here are five easy street photography projects to help spark your creativity, give you some ideas of great subjects to look for and the right techniques to use for the best results.
Best street photography projects: 01 Candid portraits
People pictures present the biggest challenge for the aspiring street photographer, so let’s tackle them first…Approaching the shot
There are two main ways you can shoot candid portraits. The easiest is to use a long lens and shoot from a distance, so that the subject isn’t aware you’re photographing them.The advantage of this approach – apart from the fact that it means you don’t have to approach a complete stranger – is that it can result in much more ‘candid’ shots, with natural behaviour and expressions.
Alternatively you can get in much closer, with a wider lens. It is more difficult to get candid results from closer to the subject, as they will be much more likely to react to the camera.
But if you take the time to engage with your subject – by haggling for some produce at market stall, for example – it can give a more intimate and personal feel to your images than shooting from a distance.
Recommended lens
This will depend on whether you want to shoot from close to the subject, or from further away, but a superzoom lens such as an 18-200mm will allow you to shoot both styles without having to waste time change lenses – which may be critical for spur-of-the-moment shots.Essential settings
As with any portrait, the background is almost as important as the subject, so you need to decide whether to blur the background by using a wide aperture, such as f/2.8, or whether to keep it sharp by using a smaller aperture, such as f/8, which might be the case if the background is relevant, or adds to the story in some way.In either case, it’s a good idea to use Aperture Priority mode – that way, all you have to do is set the aperture – the camera will then work everything else out automatically, leaving you free to concentrate on framing, composition and so on.
Whether you’re shooting from near or far, you definitely don’t want to waste precious seconds fiddling about with camera settings.
The only thing you do need to keep an eye on is the shutter speed. If it becomes too slow to shoot handheld at the aperture you’ve set, you may need to up the ISO.
As a rule of thumb, if you’re shooting in sunny conditions, an IS0 of 100 or 200 is probably fine, but if it’s a bit overcast or very early or late in the day, you may need to up it to 400 or even 800.
The good news is that you can check this by shooting something as simple as your hand held out in front of you – so long as the lighting stays fairly constant, you can then set the ISO and forget all about it, which again means not getting bogged down in settings while you’re actually shooting.
Things to watch out for…
Shooting candid street photography isn’t for the faint-hearted, as not everyone will appreciate having their photograph taken.The main thing to watch out for is how people react to the camera. Don’t be confrontational, but also don’t skulk around in the shadows, as both approaches can cause problems.
Just be open and reasonable when dealing with people, and don’t push your luck if someone objects to you taking their picture.
For both distant and close-up candids, it also helps to take lots of pictures of other things first – this not only makes people aware of your camera, but also gives the impression that you’re interested in shooting everything around you, not just them (even if you’re not!).
This has the added advantage of making them feel less self-conscious, which will result in more natural-looking portraits.
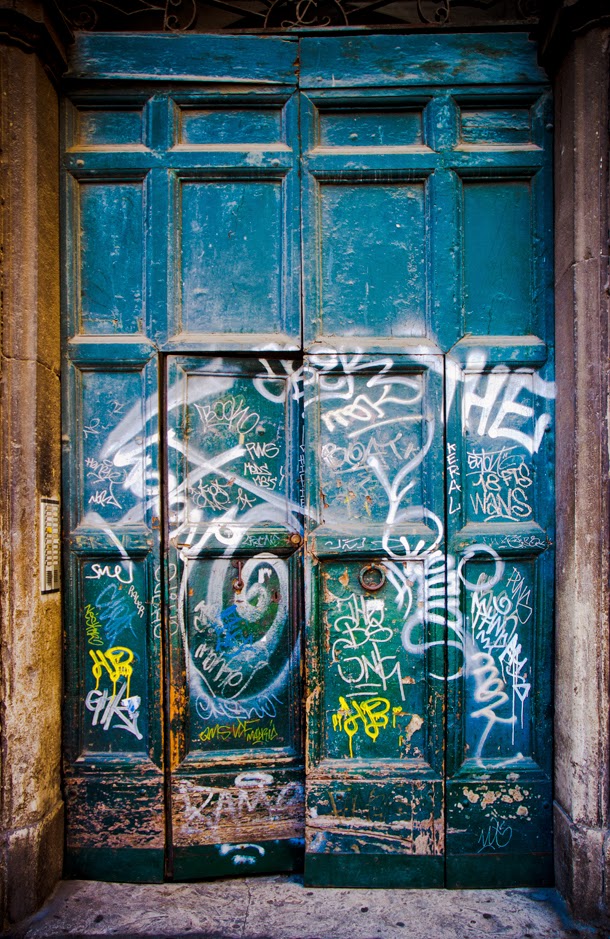
Best street photography projects: 02 Signs and graffiti
Cities are vibrant, colourful and multi-textured, and a good way to capture this colour and texture is to seek out and photograph street art…
Approaching the shot
Finding suitable subjects is half the battle when looking for signs and graffiti, but once you’ve found them the viewpoint is the main decision you have to make.The main factor in this is the background – if there is a suitable backdrop you can shoot along the street, to include the surroundings.
The alternative approach, especially if the surroundings aren’t photogenic, is to shoot the subject head-on.
Recommended lens
A standard 35mm or 50mm lens is great for shooting signs and graffiti. These tend to offer a wide maximum aperture for isolating different areas of the image (by blurring out foreground and background) and also have very little distortion, so that areas at the edges of the image remain straight, rather than curved.
Essential settings
When including the street as a backdrop you will need to decide whether to blur the background or keep it sharp, so as with portraits, the aperture is the key setting you need to control when shooting signs and graffiti.You should choose a wide aperture to blur out the foreground and background, but remember that you’ll usually need to keep most of the main subject sharp, too.
A setting like f/4 or f/5.6 is usually a good compromise.
Things to watch out for…
Graffiti is often located in areas that aren’t the safest to walk around, so you need to keep a close watch on your surroundings and your gear.
It’s all too easy to become engrossed in what you’re shooting, so if possible take a friend along, as it’s usually safer if another person can watch out for any likely issues, and avoid them before they become problems.
In terms of the subject itself, keep an eye out for complimentary colours – in our shot, the bright whites and yellows work well against the deep, vibrant blues of the door.
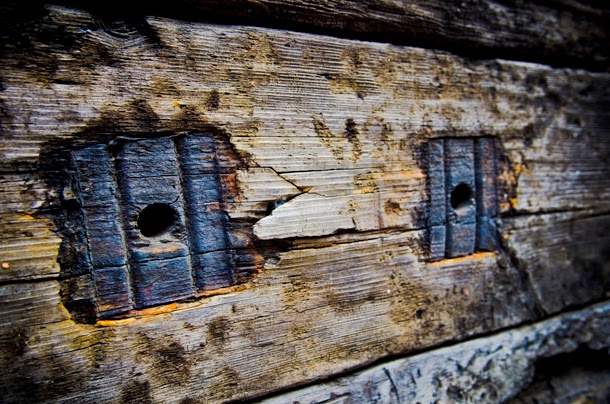
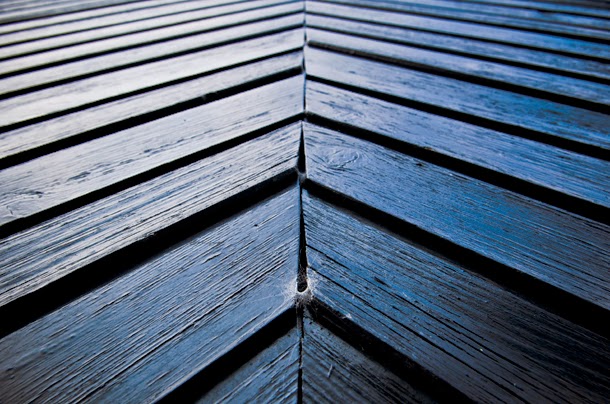
Best street photography projects: 03 Macro details
As with nature photography, getting up close can give you a whole new perspective on familiar subjects
Approaching the shot
It can take a while to get your ‘eye’ in when shooting small details and macro images, so once you’ve found a location with some potential subjects, it’s worth spending some time simply exploring different viewpoints and subjects to help you get used to looking at the world in miniature.
Recommended lens
To get really close to the subject you’ll need to use a dedicated macro lens, but for larger details a standard 30mm or 50mm lens will work fine.
Essential settings
To keep control of the depth of field you should shoot in Aperture Priority (a or Av) mode, then choose a wide aperture, such as f/4, to isolate the subject and blur out the background.You will also find that manual focusing will give more reliable and consistent results than relying on autofocus.
If you’ve got time, it’s well worth using a tripod, as this will enable you to position the point of focus, and frame your shot, very precisely.
As with candid portraits, if you’re not using a tripod you’ll need to keep an eye on the shutter speed.
Things to watch out for…
When shooting small subjects, it’s often the smallest details that make the difference, so make sure that you check the background for distractions that will detract from the main subject.
If you’re setting a wide aperture to ensure a shallow depth of field, you need to pay particular attention to focusing, to be sure that the most important area of the subject is sharp.
As with graffiti and street signs, colour is important, but so too is texture and detail, as our example shows.
Approach it like any other macro shoot, and you won’t go far wrong!
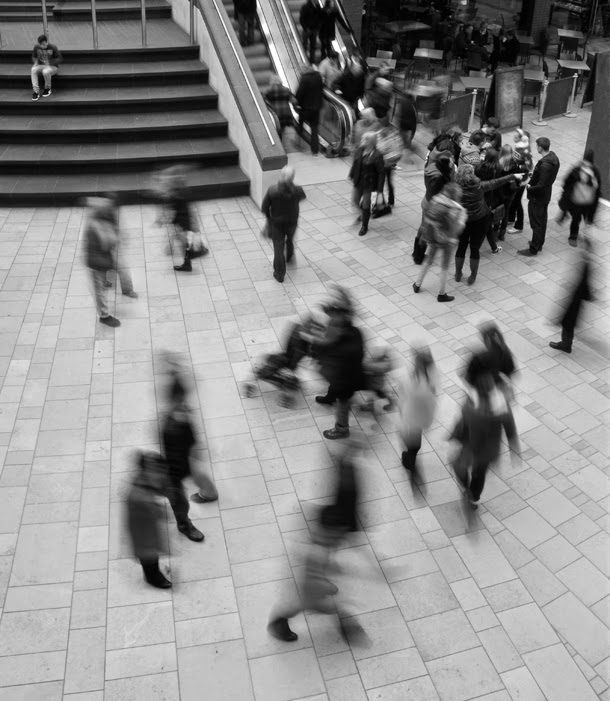
Best street photography projects: 04 People and traffic
Cities are invariably busy, bustling places, and there’s no better way to capture this than by slowing everything down…
Approaching the shot
To achieve this effect you’ll need to use long shutter speeds, so ideally you’ll need to use a tripod.Setting up a tripod on a busy street can be difficult, so try to find a fairly quiet area where you still have a view of a busy street or walkway, to keep you and your kit safe.
It’s also worth looking out for elevated vantage points, such as bridges or balconies, as looking down on a road or walkway is a great way to ensure cleaner, less distracting backgrounds than shooting at street level.
Recommended lens
The wide end of a standard zoom is perfect for this style of shot, although you can also try shooting with a longer lens for more distant subjects, or even an extreme wide-angle in confined spaces.
Essential settings
You’ll need to choose a shutter speed that will allow you to blur the movement of the subjects in your particular scene, but still keep them recognisable in the image.You can use Shutter Priority (S or Tv) mode, but if you will get more consistent results by using manual exposure.
For slow-moving subjects like people walking, begin with a shutter speed of around 1/4 sec, while for fast-moving subjects such as cars, trams or buses, a shutter speed of 1/15 sec is a good starting point.
Things to watch out for…
The success of this style of shot relies on the balance between the blurred and sharp areas in the frame, so try to ensure the background is clean enough that your blurred subjects will stand out against it (such as a plain pavement or road).It also helps to to include at least one easily recognisable sharp element in the scene.
In bright light conditions it may not be possible to achieve the slow shutter speeds necessary for blurring some subjects.
In these situations you’ll need to use either a plain neutral density filter or a polarising filter to reduce the amount of light reaching the sensor.
This in turn will enable you to set a slower shutter speed.
Best street photography projects: 05 Panning
As with sport, there’s no better way to capture the speed and energy of a moving subject than by panning…
Approaching the shot
Choosing a location where you can get a clear view of a moving subject, without any people, lampposts or other obstructions getting in the way, is essential for successful panning shots.
The further you are away from the subject, the easier it will be to get a smooth pan, so for your first attempts it’s best to find a wide, open street to shoot on.
The further you are away from the subject, the easier it will be to get a smooth pan, so for your first attempts it’s best to find a wide, open street to shoot on.
Recommended lens
A standard kit lens, such as an 18-55mm, is perfect for most panning shots taken on the street, as it gives you the option to use a wider view (if you want to include more of the surroundings), or to zoom in and isolate individual vehicles.
Essential settings
As with capturing motion blur, shutter speed is the key to successful panning, so set your camera to Shutter Priority (S or Tv) mode, then experiment with different shutter speeds for subjects travelling at different speeds and distances from the camera.
For slow-moving subjects like cyclists, start with a shutter speed of around 1/8 sec, while for faster-moving subjects like cars, start by shooting at 1/30sec.
For slow-moving subjects like cyclists, start with a shutter speed of around 1/8 sec, while for faster-moving subjects like cars, start by shooting at 1/30sec.
Things to watch out for…
Getting the right balance between a sharp subject and blurred background takes practice.
For the best chance of getting this right you need to move your camera as smoothly as possible throughout the panning action, which is easier if you can get a clear view of the subject for as long as possible.
Choose a location where this is the case, and track the subject through your viewfinder as it goes past – that way, you can fire off your shot, or shots, at the peak of the action.
No comments:
Post a Comment