Though it may seem daunting setting up a new camera, it only takes a few moments. Our Head of Testing, Angela Nicholson, shares her best camera tips and explains which camera settings to use so you can start taking great photos.

 When you insert a memory card into your new camera it’s a good idea to format it as this prepares it for use and deletes any existing data on it to maximise space.
We repeat – this deletes any existing data, so if you have any images on the card that you want to keep, download them to your computer before formatting the card.
It’s a simple process to format a card in-camera, just press the menu button and locate the format option – it’s often in the set-up or playback area, but it varies from brand to brand. Once you’ve found it, select it and hit OK then follow any on-screen instructions.
2. Image Quality: Extra Fine or Highest Quality JPEG
3. Image Size: Large
 Most camera menus provide the option to shoot images at a range of sizes, or pixel counts. Smaller images take up less space on your memory card and are quicker to upload to Facebook etc, but to get the maximum benefit from your camera’s sensor you should select to shoot the largest images possible.
4. Exposure mode: Auto
5. Sensitivity: Auto
6. White balance: Auto
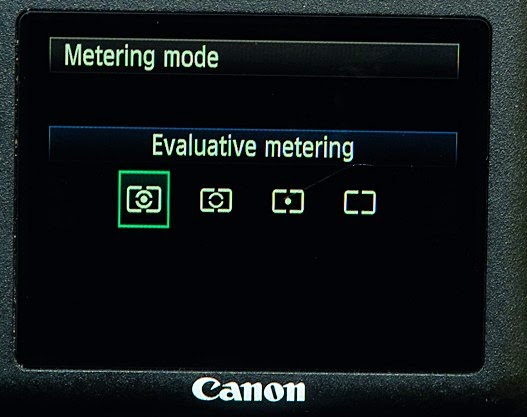 Your camera’s light metering system measures the amount of light available and suggests (or sets) appropriate exposure settings.
The name of the multi-purpose setting varies depending upon the brand of camera, but it’s often called Evaluative, Matrix, Multi-area or Multi-segment metering and it is the best option to use when you are starting out in photography.
This setting tells the camera to look at several areas across the whole frame and suggest/set aperture and shutter speed settings that give a balanced exposure.
In automatic focusing mode the camera will do the work for you. It will focus on the point under the selected autofocus (AF) point.
You may notice that there are usually two or three autofocus options options Single AF, continuous AF and Automatic AF mode. When Continuous AF mode is selected the camera will drive the lens focus mechanism as long as you hold the shutter release button down.
Many cameras also have an Auto AF mode in which it uses Single AF until it detects that the subject is moving and then switches to continuous AF mode.
In most situations you want to use Single AF mode so the lens focuses at one point and doesn’t change if you move the camera to recompose the image.
By default most cameras automatically set the AF point (where it’s going to focus) for you. It’s a useful option, but the camera often assumes the nearest object is your main subject.
In many cases its best to select a single focusing point that can be placed over the subject and used for more precise control. Look for a single point AF mode.
When your camera’s drive mode is set to Single or Single Frame it will only take one shot when you press the shutter release down. To take a second shot you have to lift your finger off the shutter button and then press again.
This is ideal for most shooting situations. The alternative is Continuous Shooting and in this mode the camera continues to take photographs for as long as you have your finger on the remote release button.
It is often used in conjunction with continuous AF mode to photograph moving subjects.

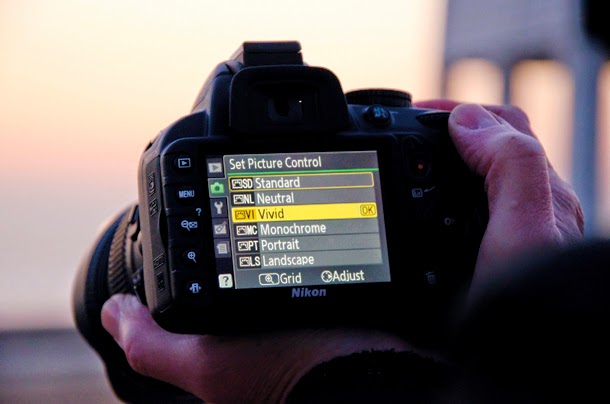
Many DSLRs and CSCs offer a collection of settings called Picture Styles, Picture Controls or Photo Styles. These are designed to tailor image colour, contrast and sharpness to suit a particular scene.
In Landscape Picture Style, four example, the camera usually enhances green and blue while boosting the sharpness and contrast a little.
These settings do not control exposure and should not be confused with Scene modes that set appropriate shutter speed and aperture settings for you – as well the Picture Style.

1. Format the card
We repeat – this deletes any existing data, so if you have any images on the card that you want to keep, download them to your computer before formatting the card.
It’s a simple process to format a card in-camera, just press the menu button and locate the format option – it’s often in the set-up or playback area, but it varies from brand to brand. Once you’ve found it, select it and hit OK then follow any on-screen instructions.
2. Image Quality: Extra Fine or Highest Quality JPEG
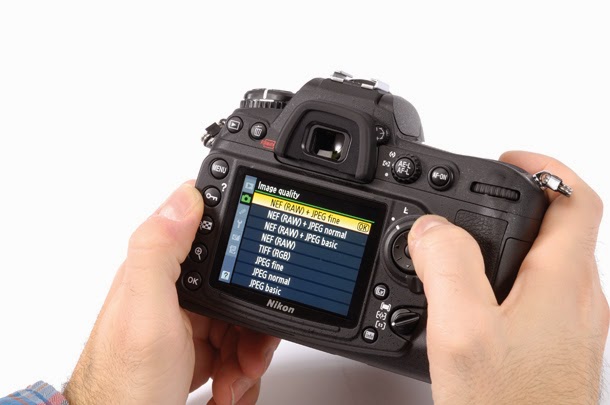
All digital cameras allow you to save images as JPEG files, but some also allow you to save them as raw files and raw and JPEG files at the same time.
Raw format files capture the maximum amount of data and they are the best option to use if you want to do lots of editing of images on the computer, but they require specialist software to process them because they are not a universally recognised format.
Fortunately, raw file conversion software, which allows some editing of raw files and their conversion to more widely recognised TIFF and JPEG files is usually provided with your camera.
Don’t forget, if you email a friend a raw image they are unlikely to be able to open it. They should be able to see JPEG files, however.
The JPEG format is also required if you want to upload images to social media sites like Facebook and Twitter, or to online labs to make prints.
If you want the best of both worlds, set your camera to record raw and JPEG files, but bear in mind that the memory card will fill up much more quickly.
3. Image Size: Large

4. Exposure mode: Auto
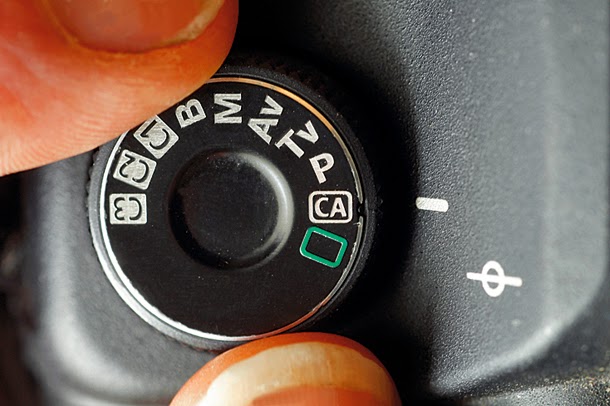
Compact system cameras, DSLRs and high-end compacts offer a range of exposure modes – the method by which the correct exposure is set.
If you choose the Automatic option your camera will make the decisions for you so you can get shooting. If you would like to take a bit more control, however, try using one of the Scene mode options (Portrait, Landscape etc) that tailors the camera’s exposure and colour settings to suit the subject.
When you gain a bit more experience and confidence you may like to try using more advanced options like aperture priority and shutter priority.
In aperture priority mode you set the size of the aperture depending upon how big you want the area of the image that is in focus to be and the camera sets the shutter speed.
In shutter priority mode you set the shutter speed to freeze or blur, movement and the camera sets the aperture.
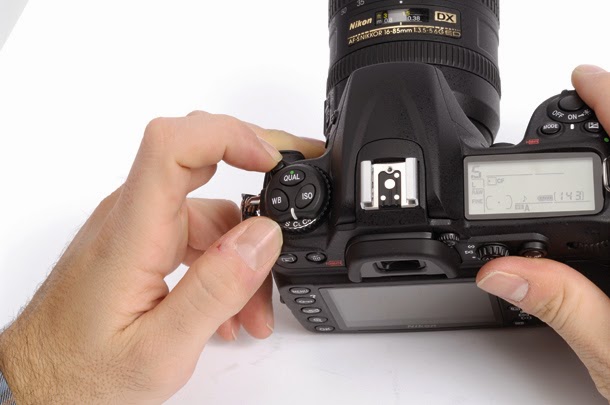
5. Sensitivity: Auto
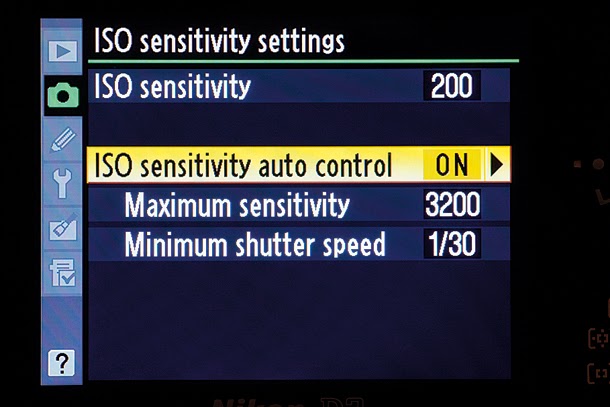
The sensitivity or ISO setting determines how much light the camera needs to capture an image. At high ISO settings like ISO 6400 the camera only needs a small amount of light, but the image may be noisy and have some speckling visible.
Using a low sensitivity setting ensures high image quality, but it may require a slow shutter speed or large aperture setting. To save having to worry about this in the early days, set the camera to its automatic ISO setting.
6. White balance: Auto
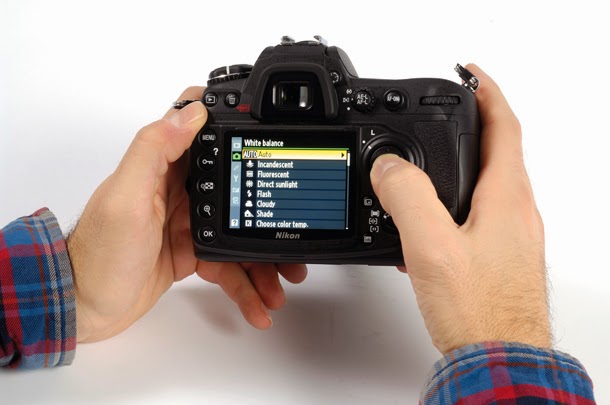
Different light sources produce light of slightly different colours but our brains do a great job of correcting the colour shift. The camera’s automatic white balance setting attempts to do the same thing.
It may not always get it right, and it may sometimes over-correct, but it’s a great starting point.
7. Metering: Evaluative, Matrix or Multi-segment
The name of the multi-purpose setting varies depending upon the brand of camera, but it’s often called Evaluative, Matrix, Multi-area or Multi-segment metering and it is the best option to use when you are starting out in photography.
This setting tells the camera to look at several areas across the whole frame and suggest/set aperture and shutter speed settings that give a balanced exposure.
8. Focus: Auto
There are two main focusing options, automatic and manual. In manual mode you have to rotate the lens’ focusing ring to get the subject sharp.In automatic focusing mode the camera will do the work for you. It will focus on the point under the selected autofocus (AF) point.
You may notice that there are usually two or three autofocus options options Single AF, continuous AF and Automatic AF mode. When Continuous AF mode is selected the camera will drive the lens focus mechanism as long as you hold the shutter release button down.
Many cameras also have an Auto AF mode in which it uses Single AF until it detects that the subject is moving and then switches to continuous AF mode.
In most situations you want to use Single AF mode so the lens focuses at one point and doesn’t change if you move the camera to recompose the image.
By default most cameras automatically set the AF point (where it’s going to focus) for you. It’s a useful option, but the camera often assumes the nearest object is your main subject.
In many cases its best to select a single focusing point that can be placed over the subject and used for more precise control. Look for a single point AF mode.
9. Drive Mode: Single
When your camera’s drive mode is set to Single or Single Frame it will only take one shot when you press the shutter release down. To take a second shot you have to lift your finger off the shutter button and then press again.
This is ideal for most shooting situations. The alternative is Continuous Shooting and in this mode the camera continues to take photographs for as long as you have your finger on the remote release button.
It is often used in conjunction with continuous AF mode to photograph moving subjects.
10. Image stabilisation: On
If your camera or lens has a stabilisation feature you should turn it on because it will help you to get sharper shots by compensating for the slight shaking that occurs when you hold it to take a shot.
It should be turned off if you put the camera on a tripod to hold it rock-steady.
It should be turned off if you put the camera on a tripod to hold it rock-steady.
11. Picture Style or Picture Control: Standard
Many DSLRs and CSCs offer a collection of settings called Picture Styles, Picture Controls or Photo Styles. These are designed to tailor image colour, contrast and sharpness to suit a particular scene.
In Landscape Picture Style, four example, the camera usually enhances green and blue while boosting the sharpness and contrast a little.
These settings do not control exposure and should not be confused with Scene modes that set appropriate shutter speed and aperture settings for you – as well the Picture Style.
12. Colourspace: Adobe RGB
A colourspace basically defines the range of colours that a camera can capture. Most DSLRs and CSCs offer two options, Adobe RGB and sRGB. Adobe RGB has a wider gamut which means the camera will capture more colours when this mode is selected.
Most monitors can only display the smaller sRGB colourspace and online labs tend to use it, so if you plan to have lots of prints made by a lab it may be worth switching your camera to sRGB so you capture images within the range that the lab can reproduce.
You can however, convert images to sRGB using photo editing software.
No comments:
Post a Comment