Wednesday, 22 April 2015

How to make a digital infrared photo?

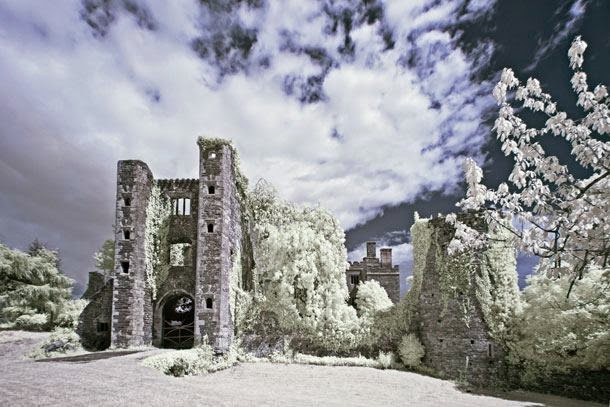
Infrared Landscape

Infrared photography can add a ghostly appearance to images shot on bright, sunny days. As a result it’s an effect that’s particularly suited to photos that feature Gothic architecture, castles, abandon buildings and ancient monuments. But it’s a technique that’s just at home with portraits and wildlife photography.
The majority of digital camera sensors include an infrared blocking filter for standard photography, and this needs to be removed in order to be able to take infrared pictures. Converting a camera to infrared like this means that you won’t be able to use it for regular full colour photography, so you’ll need to adapt a spare camera.
Not all of us happen to have an old digital SLR knocking around or the spare cash to convert it into an infrared camera. But there is an alternative: using an infrared filter. This screws onto the front of the lens and blocks all light bar infrared.
IR filters are very dark though, which means long exposure times – they’re useless for taking infrared photos of moving subjects.
You won’t be able to see anything through the viewfinder either, so it’s best to compose and manually focus before adding the filter. You’ll also need to spend a little time converting the image later.
If you don’t want to buy a filter, you can always learn how to add an infrared effect in Photoshop (Soon will be available). You can try this technique with any image, although if you take a photo with a fake infrared look in mind you’re more likely to end up with a successful result.
Tuesday, 14 April 2015

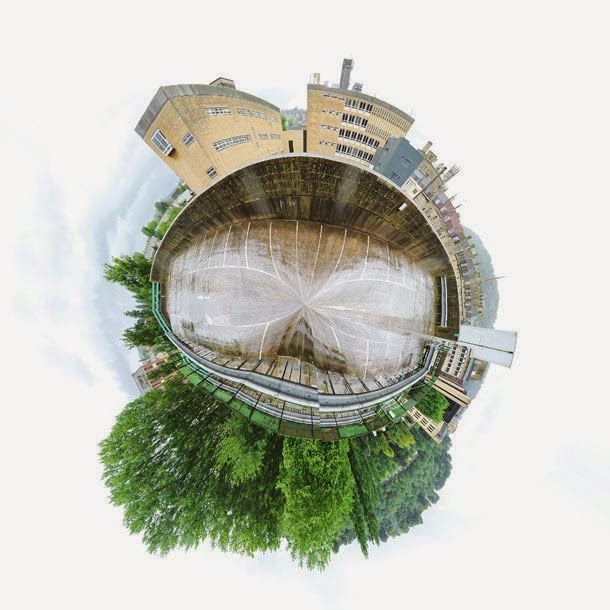
How to make a 360 degree polar panorama

360_degree_Panorama

Polar panoramas are fun takes on the traditional panoramic ‘strip’. The principle is the same – take a sequence of images that you then stitch together in software – it’s just that you create a circular ‘world’ image at the final stage of the process.
As with other types of panoramic photography, you need a methodical approach to taking the individual frames. Take test shots of the brightest and darkest parts of the scene and work out the base exposure from these results. Use manual mode to set the aperture and shutter speed, and set the white balance and focus manually too, as this will ensure consistency across the sequence of pictures.
Make sure the tripod and head are level and, when you move the camera, allow for approximately 1/3 overlap between each frame. Shooting enough frames to cover a 360 degree image will mean your final panorama ‘globe’ won’t look stretched or have an obvious join.
Use panorama software such as Photoshop’s Photomerge option to stitch and blend the frames together. The next stage involves flipping the panorama photo vertically and resizing it to create a square image. To do this, use Image > Image Size in Photoshop. Make sure the ‘Constrain aspect ratio’ link box is unchecked and then change the width and height to the same value.

The final step is to use Filter > Distort > Polar Coordinates, selecting Rectangular to Polar in the dialog box that appears.

Sunday, 12 April 2015

How to make a Double Exposure Portrait Photo

Dual Exposure

Combining one photo with another isn’t a new technique: it’s been around since the late 19th century.
One of the most popular forms of double exposure photography is the combination of a portrait with a natural pattern. A strong texture tends to work best, whether it’s foliage, tree branches shot against a white sky or cracked earth.
Some DSLRs have a multiple exposure mode that enables you combine images in-camera. You can produce some quite striking images without resorting to Photoshop manipulation. Don’t believe us?

For a clean silhouette, you’ll need a white backdrop – getting low and photographing your portrait-sitter against a bright, cloudy sky is ideal. Do the same with the image you’ll be combining it with. Working in Live View mode is best, as you will be able to display the first image on the rear screen while you align the second. The two frames will then be automatically merged, with the texture being visible in the darker areas of the first image.

Not all cameras can take multiple exposures, in which case you’ll need to combine the photos in image editing software. Making a double exposure portrait in Photoshop (Lets see in another tutorials) is a simple process and one which provides an endless opportunity to fine-tune the blend between the portrait image and the texture.

Monday, 6 April 2015

How to make a DIY macro lens?


Macro lenses are brilliant optics, but you don’t need to spend much for one if you’re just a casual macro photographer. In our latest DIY Photography Tricks post we show you how to make a DIY macro lens using a simple cardboard tube…
If macro photography is your passion, spending a few Thousand rupees on a decent macro lens is a must. Altertnatively, you could get an extension tube or a close-up filter to enlarge your subject. But what if you want to get really close to your subject without the expense, perhaps just to try macro out?
It’s surprisingly easy to convert a standard lens into a macro, using nothing more than a cardboard tube, an old camera body cap and some tape…

How to make a DIY macro lens

01 Make a camera fitting
Start with a way to attach the lens to the camera. Find an old body cap. Drill a few holes on the inside, then use a small saw or a file to create an aperture in the middle.

02 Find a tube
We need distance between the sensor and lens to extend the focal length. Find a cardboard tube with roughly the same diameter as the body cap.

03 Prepare the tube
Cut the tube to about 15cm: this will vary depending on your lens you use, but it’s a good starting length. To stop light from bouncing around, stick black paper inside.

04 Fit the lens
Use insulation tape to stick the body cap inside the tube. With the front of the lens facing the tube, tape it in place so the end that usually fits onto the camera is exposed.

05 Set the aperture
On the back of the lens is a lever that camera uses to set the aperture. Position it so that the aperture is fully open and fix it with tape.
06 Start shooting!
In your camera’s menu, activate the setting that enables the camera to shoot without a lens. Fix the camera on a tripod, set to Manual and take a few test shots.
Final tip
When you shoot, you’ll need to adjust the shutter speed to get the correct exposure. To focus, change the camera’s distance from the subject.

Source: DIY Photography

9 creative photo ideas to try in April 2015

As part of our ongoing series to help you get more creative with your digital camera, each month we publish some fun, seasonal, creative photo ideas to help inspire your imagination. Along with some amazing images, we’ve also provided some quick photography tips by both amateur and professional photographers who are experts in these fields.
We’re introducing April with a new list of exciting photo projects like brooding landscapes, portraits of mothers and babies, creative forests and even selling your images!

Creative photo ideas for April: 01 Shoot brooding landscapes


Trying to come up with new ways of shooting landscapes is always a good idea. It’s all too easy to fall into clichés with the landscape genre, and rely too much on tried and tested techniques that produce rather predictable images.
Kartik Rawal went to the popular landscape Jungle of Sirohi-KalkaJi, but managed to come back with something very special indeed by shooting with an DSLR, then doing some creative experimentation afterwards in Photoshop.
Kartik, whose project on deserted roads has also attracted lots of attention, explains he has been taking pictures most of his life, but became a little more obsessive about it 10 years ago while filming a documentary for Surat city.
“Getting lost is half the fun,” says Kartik of his photographic travels.
Get started today
#1   Converting your camera to infrared can yield great results – but do bear in mind that it’s a very bold step to take, as the process cannot be reversed.
#2   “Once you have found the subject you wish to shoot, be aware of its surroundings – how do they interact with your subject?” says Kartik.
#3   Kartik points, you should think carefully about how light affects the subject. “Will waiting for the ‘right light’ helps you much? A different time of day maybe, if you’re lucky?”
#3   “Then use these elements to help build a narrative for the image,” Kartik adds. “These are the stepping stones that help the viewer navigate the image and hopefully make them come back and see something different on the second viewing.”