The time for bluebell photography is just around the corner. In this tutorial we explain when to take pictures of bluebells, where to find them and how to set up your camera for the best results.
You have to be watchful at this time of year, because it’s almost time to go down to the woods – not for the teddy bears’ picnic, of course, but for something much more inspiring than that… it’s time for bluebells!
Their wonderful carpets of blue and green are one of the signs of spring, and make for fantastic photos.
Depending on seasonal temperatures and how far south you are, there’s a short window from about mid-April to the end of May during which you can see bluebells. With this year’s mild winter in the UK they may be early, so don’t miss them!
One of the joys of spring in Britain is walking through a woodland to enjoy the birdsong, smell the scented air, see the wildlife and enjoy the peaceful atmosphere.
An established beech wood is best for photographs, as you get tall, straight trees with little undergrowth and not many offshoots or branches protruding from trunks.
You ideally want an open aspect to the east or west side of the woods where you can shoot towards a low sun that’s not too strong.
One bit of advice, though: try to stay on the path and don’t trample the blooms, so others can enjoy them too.
You’ll need a tripod for those long shutter speeds, and to get maximum benefit from a tripod you’ll need a remote release.
A hotshoe spirit level is also useful. Woods are often muddy places, and a kneeling mat or plastic sheet will help keep you clean. You may also want to wear your wellies!
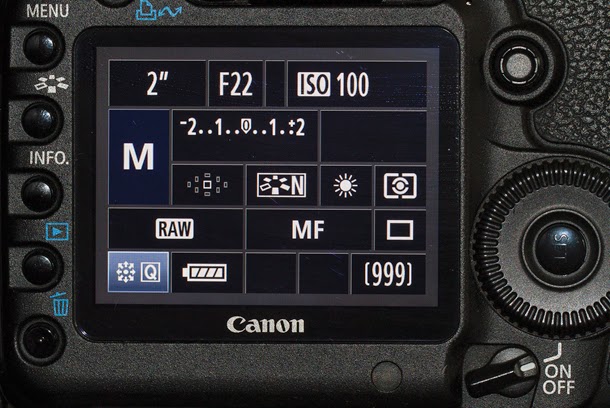
For an image that you’re going to blur, you could use almost any ISO setting because noise won’t show up. Since we wanted to also capture some lovely bluebell images that wouldn’t be blurred, we chose Raw capture and ISO 100 for the quality.
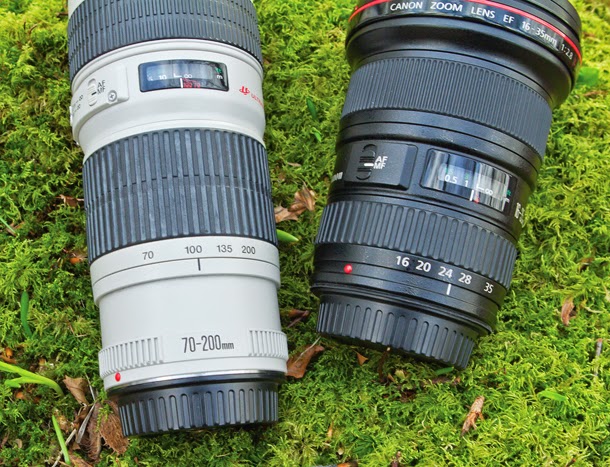
We were lucky with our carpet of blooms, so went with a 24mm on a full-frame body, equivalent to 15mm on an APS-C model.
Which lens you use is a personal choice based on your location. The usual technique is to shoot wide and low to the ground to include lots of blooms close to the lens, but if the flowers are a little sparse try a long lens: shoot higher, and use its perspective compression to stack the bluebells so they look more dense.
A longer lens and higher vantage point will help, but for the best images you need a calm day. When you want to use a low ISO and a narrow aperture, shutter speeds can get long; that’s why, on some days, a creative blur can be really helpful.
It’s best to be about 100 metres from the edge of the wood looking outwards, but this is dependent on the focal length of your lens.
You want enough trees to blur, but not so many that the image is cluttered. And if there are too few trees, they can look very thick and dark. Shooting towards the sun near the start or end of the day is best.
It’s good to bracket exposures from correct exposure (no flashing warnings) to about two stops over in one-stop increments.
The best image to blur is about 1.3 to 1.6 stops overexposed. This means that when you look at the image on the camera’s LCD with the overexposure warning switched on, the area between the trees will be flashing black and white, and the histogram will be towards the right-hand side with a large spike at the right.
If you have the opportunity, shoot just after it’s been raining: not only will the rain refresh the flowers; the sparkling wet reflections on the flowers can look great.
Also, be aware that the light filtering down through the canopy of leaves can create a green colour cast; setting White Balance to Auto may help, but setting a custom white balance will correct for the overabundance of green light, and will help you to retain the subtle blue tones of the flowers.
If you’re lucky enough to own a tilt-shift lens the shift adjustment can be used to do great pan-blurs without having to move the camera.
 |
| Images Captured By Sudhir Rawal |
Their wonderful carpets of blue and green are one of the signs of spring, and make for fantastic photos.
Depending on seasonal temperatures and how far south you are, there’s a short window from about mid-April to the end of May during which you can see bluebells. With this year’s mild winter in the UK they may be early, so don’t miss them!
One of the joys of spring in Britain is walking through a woodland to enjoy the birdsong, smell the scented air, see the wildlife and enjoy the peaceful atmosphere.
An established beech wood is best for photographs, as you get tall, straight trees with little undergrowth and not many offshoots or branches protruding from trunks.
You ideally want an open aspect to the east or west side of the woods where you can shoot towards a low sun that’s not too strong.
One bit of advice, though: try to stay on the path and don’t trample the blooms, so others can enjoy them too.
How to photograph bluebells
01 Camera setup
When you’re in the woods photographing bluebells you’ll want to use a low ISO for quality and a narrow aperture to capture a great depth of field.You’ll need a tripod for those long shutter speeds, and to get maximum benefit from a tripod you’ll need a remote release.
A hotshoe spirit level is also useful. Woods are often muddy places, and a kneeling mat or plastic sheet will help keep you clean. You may also want to wear your wellies!
02 DSLR settings
We also went for a narrow depth of field with f/22 and adjusted the shutter speed to obtain our necessary exposure. We manually focused the lens on the nearest tree using Live View.
03 Lens choice
We were lucky with our carpet of blooms, so went with a 24mm on a full-frame body, equivalent to 15mm on an APS-C model.
Which lens you use is a personal choice based on your location. The usual technique is to shoot wide and low to the ground to include lots of blooms close to the lens, but if the flowers are a little sparse try a long lens: shoot higher, and use its perspective compression to stack the bluebells so they look more dense.
04 Watch the wind!
Your biggest enemy for this kind of shot is wind! A flower photographer has to really watch the weather forecast, not just for the light but also for anticipated wind gusts.A longer lens and higher vantage point will help, but for the best images you need a calm day. When you want to use a low ISO and a narrow aperture, shutter speeds can get long; that’s why, on some days, a creative blur can be really helpful.
05 Creative blur
If you’re after creative blur, like our image on the previous pages, it helps to have tall, straight trees with little scrub and few branches on the trunk; a beech tree wood is ideal.It’s best to be about 100 metres from the edge of the wood looking outwards, but this is dependent on the focal length of your lens.
You want enough trees to blur, but not so many that the image is cluttered. And if there are too few trees, they can look very thick and dark. Shooting towards the sun near the start or end of the day is best.
06 Exposure for blur
It’s good to bracket exposures from correct exposure (no flashing warnings) to about two stops over in one-stop increments.
The best image to blur is about 1.3 to 1.6 stops overexposed. This means that when you look at the image on the camera’s LCD with the overexposure warning switched on, the area between the trees will be flashing black and white, and the histogram will be towards the right-hand side with a large spike at the right.
Final Tip
If you’re shooting with side lighting, a polarising filter can really help to remove glare and perk up your colours.If you have the opportunity, shoot just after it’s been raining: not only will the rain refresh the flowers; the sparkling wet reflections on the flowers can look great.
Also, be aware that the light filtering down through the canopy of leaves can create a green colour cast; setting White Balance to Auto may help, but setting a custom white balance will correct for the overabundance of green light, and will help you to retain the subtle blue tones of the flowers.
If you’re lucky enough to own a tilt-shift lens the shift adjustment can be used to do great pan-blurs without having to move the camera.


No comments:
Post a Comment